

Every fall, Apple announces a release of a new iPhone operating system version – iOS. This year, we are expecting iOS 18 with lots of big changes.
As in previous years, hundreds of thousands of users will receive an update notification and will hit the “Agree” button. And just as years before, a lot of them will get stuck with it… Unfortunately, fresh operating systems aren’t 100% stable, and it’s better to be ready for any scenario.
- When to expect the iOS 18 update?
- What devices are compatible with iOS 18?
- How to prepare your iPhone before the iOS 18 update?
When to expect the iOS 18 update?
Apple usually announces new devices and iOS at its annual WWDC – Apple Worldwide Developer’s Conference in California, USA. The one for 2024, WWDC24, at which iOS 18, iPadOS 18 and the new macOS were presented for the first time, took place from June 10 to 14.
The first public beta of iOS 18 was released on July 15, 2024. As usual, Apple never clearly reveals when a new iOS is coming out. However, based on previous years, it’s clear that iOS 18 will appear a week or two after the official announcement of the iPhone 16 in early September. Some experts predict that iOS 18 will be released on one of the Mondays in September: for example, on Monday September 16.
What devices are compatible with iOS 18?
Fortunately, in this case, Apple is giving us a little more information. But it may not appeal to everyone. Since iOS 18 requires a device to run under at least A12 Bionic chip (or later), users with iPhone 8 or iPhone 8 plus or iPhone X are going to be left behind.
Here is a complete list of devices that will support the iOS 17 update:
iPhone models with Limited support
- iPhone XS and iPhone XS Max
- iPhone XR
- iPhone 11, 11 Pro and 11 Pro Max
- iPhone SE (2nd generation, 3rd generation)
iPhone models with Full support
- iPhone 12 and 12 Mini, 12 Pro and 12 Pro Max
- iPhone 13 and 13 Mini, 13 Pro and 13 Pro Max
- iPhone 14 and 14 Plus, iPhone 14 Pro and 14 Pro Max
- iPhone 15 and 15 Plus, iPhone 15 Pro and 15 Pro Max
- iPhone 16 and 16 Plus, iPhone 16 Pro and 16 Pro Max
How to prepare your iPhone before the iOS 18 update?
When your iPhone downloads and installs a big update such as the new iOS 18 version, it is quite some job to do. That’s why it is worth taking some precautions before.
Here are the main situations in which you may receive a “Software Update Failed” notification:
- Lack of free storage space on your device
- Problem with network connection / Impossible to connect to Apple Server
- Device was disconnected or shut down during the update download/install

We also went through the same situations and we feel you. That’s why we’ve prepared a set of instructions that reduce a risk of a software update failure to a minimum. Follow the steps below.
1. Delete unnecessary data
It is better to have a backup of the most important data before doing something new to a phone. Also, your device would require some extra space to download and install the update file. That’s why it’s good to go through your storage and empty some trash beforehand.
Still too little space left? More tips for freeing up iPhone space.
First, go to the Settings App, select General > iPhone storage to see what is taking the most of your space.
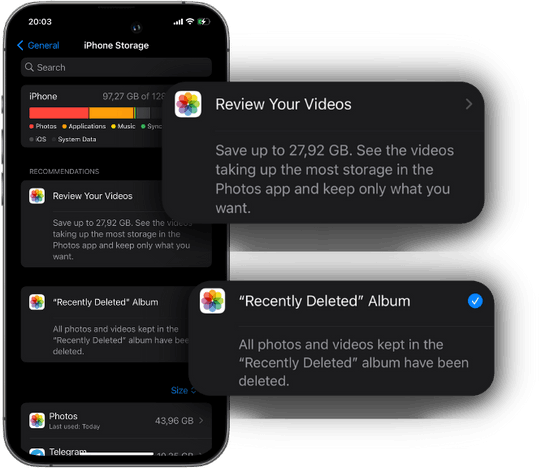
- Delete files in the “Recently Deleted” folder. Recent iOS versions don’t eliminate your photos and videos forever just after you delete them, but place them in a temporary folder where thy are stored for 30 days. This folder is located in your Photos App (select Albums > scroll down > Recently deleted). What to do if you deleted wrong photos in the Recently deleted folder.
- One of the biggest files on your iPhone are videos, especially if you shoot them in 4k. Go through the Videos album and delete those you don’t need. If you want to keep them, here is how you can transfer iPhone videos to PC in a handy way.
- Another “heavy” stuff on your iPhone is Apps. To be more precise, not the Apps themselves, but the downloaded and cached data they accumulate with time. In the iPhone Storage menu, scroll down the list and check which Apps you don’t use or which ones take the most space. Bad news, there is still no way to delete the Application Documents and Data without deleting the App itself. However, if you redownload it from the App Store after deletion, your settings are supposed to stay intact.
- If you have an impressive photo library, think of synchronizing it with iCloud (in this case you may have to purchase some extra space), or save your photos to PC.
2. Restart your iPhone
It is good to restart your iPhone from time to time in general. It helps to securely finish all the side processes, reset network connection and give your device a fresh start.
For iPhone X, Xs, XR, 11, 12, 13 and 14
- Use iPhone side buttons: press the volume up button and then the volume down button, then press and hold the side button (on the right) until the screen goes black.
- To turn it off, hold down the side button (right) and one of the volume buttons (left) at the same time until the “Power off” slider appears, then slide the slider to the right.
For more info about iPhone restart and turn off for different models, check here.
3. Check your Internet connection
To install an update, your iPhone has to download it first. Its success and speed depend on your network quality and stability. Usually, it is better to use home Wi-Fi for a faster and more secure connection. Make sure that you are connected to Wi-Fi before starting.
Here is what you can do if your update fails because of Internet connectivity issues:
- Go to Settings > General > Reset > Reset Network Settings.
- It’s good to then restart your iPhone to make everything work again.
- Important: note down your important passwords, because this option erases your autofilled Wi-Fi passwords, VPN and APN settings and network preferences.
4. Create a safe backup of your important iPhone data
Our iPhones contain gigabytes of highly precious personal data, and it would be very sad to have no backup if something goes wrong. When it comes to saving your iPhone or iPad data, you have two options:
- Create a full copy of your iPhone aka a Backup using iTunes or any third party software
- Save data selectively on your PC
Both methods have their pros and cons. If you do a backup, it’ll record almost everything and after a restore you’ll get a copy of your iPhone as it was at the moment of the backup. This option is good if you make a safe copy before the iOS 18 update. If anything goes wrong, you can just step back and recover your iPhone just as it was.
Do a full iPhone backup
Option #1. You can do a full backup with iTunes. It’s free, and you probably already have iTunes on your PC. However, iTunes doesn’t allow you to change the backup destination folder (modern iPhones sometimes contain hundreds of Gbs of data, and if your C drive is full, you are screwed), neither do it validate your backups in the end. This way, you’ll find out that the backup was corrupted only at the moment of restore.
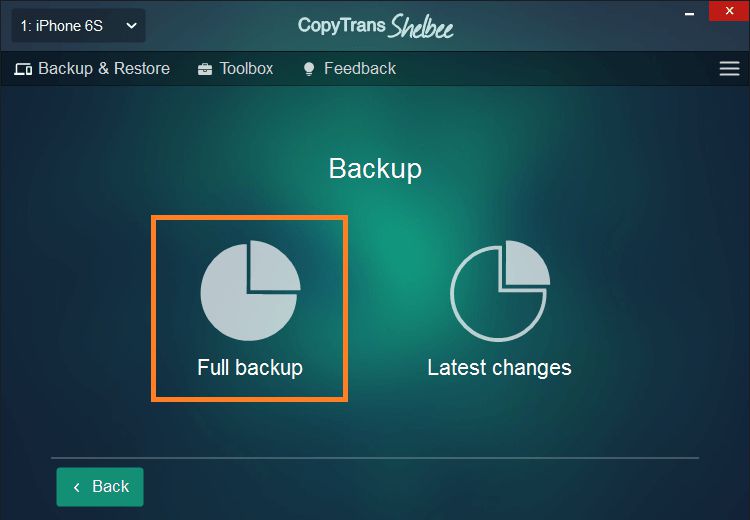
Option #2. Use a third party software.
We recommend CopyTrans Shelbee – we created it because we also wanted to have a more reliable tool for iPhone backups and restores. You can choose where to save an iPhone (even to an external drive), do encrypted or incremental backups, and also choose what data to back up and restore.
Here’s how to do a full backup before the iOS 18 update:
- Download and install CopyTrams Shelbee. It has no hidden adds or extra fees. Download CopyTrans Shelbee
- Start the app and plug your iPhone to the PC. Select Backup > Full Backup.
- Select a backup location (make sure there is enough space). You can select any folder on your PC, external hard drive or USB drive.
- Follow the steps and wait until the backup is done. Don’t unplug your iPhone nor use, nor turn it off during the process.
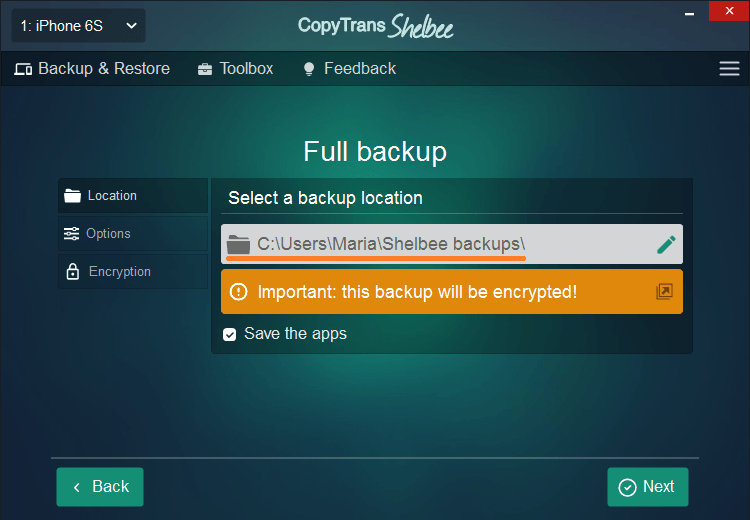
⚡ Check the “Save Apps” option to include apps in your backup. More about backing up apps here.
⚡ You’ll be asked to log in into App Store if you choose to save apps.
⚡ If you have previously added a password to your backup, you’ll be asked to enter it again. What iOS backup password?
Here is a full process of iPhone backup with all the necessary information.
If your backup takes too long, here is why.
Please remember that if you upgrade to a newer iOS, it will remain on your iPhone even if you restore an old backup.
For example,
- If you create a backup of your iPhone 15 with iOS 17
- You update your device to iOS 18
- Then restore your backup to this iPhone 15
- -> Your data will be restored, but the system will continue running under iOS 18.
Save your iPhone data to the PC: do a full backup of iPhone photos and videos
It’s good to have your precious memories safe just in case. This time, you don’t have to do an encrypted backup – your copied files will be accessible on your PC. You can then open them, modify, share or delete. Let’s see how to do it for iPhone photos and videos.
Option #1. Connect your iPhone to a PC via a USB cable and open Windows Explorer. Click on your iPhone and select the DCIM folder. Select photos that you want to save and drag them to a folder on your PC.
This method works from time to time – Windows doesn’t always display iPhone contents in the Explorer. Also, it won’t show your iPhone albums and won’t place your photos in the proper order.
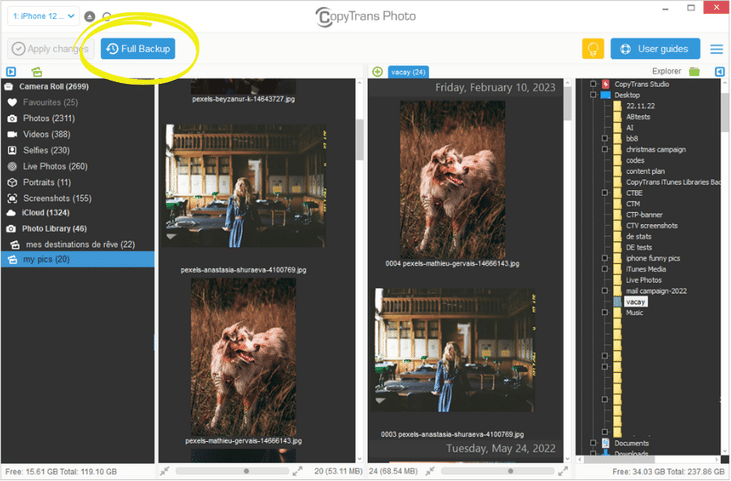
Option #2. Use a software that will do a full backup of your iPhone photos, save all your albums, keep the date and geotag and even convert heic photos to Windows compatible jpeg if you choose so – CopyTrans Photo.
- Download and install CopyTrans Photo. Download CopyTrans Photo
- Plug your iPhone to a Windows computer using a USB cable. Start CopyTrans Photo and let it load your data. You’ll see iPhone contents on the left, and Windows Explorer folders on the right.
- To save all your photos at once, click on “Full backup”, then choose a destination on your PC.
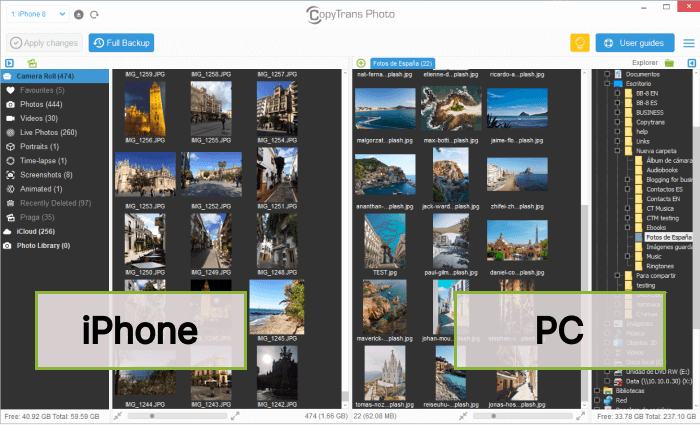
By the way, you can then update your backup in future: select the same folder with the previous backup and click on “Full backup”. CopyTrans Photo will only save new photos without creating duplicates.
You can do the same for other iPhone data. Here are some tutorials: