

 (69 votes, average: 3.67 out of 5)
There’s no direct way, like Bluetooth or AirDrop, to transfer photos from a PC to an iPhone. The easiest way would be to send a pic via messaging apps or mail. However, it often leads to quality loss. Moreover, you can only send a limited number of files.
If you wish to preserve quality and send more than a couple of pics, you will need other solutions. I will lead you through Apple-native solutions and trusted third-party apps you can use on a Windows PC. You’ll be able to find the best way whether you want a wired a wireless transfer. Choose one of the solutions below.
- Wired transfer via USB or Type-C cable, no cloud
- Free, Apple‑only, but the photos go to an album that is not modifiable on iPhone → iTunes
- Full control, simple drag-and-drop, many features, but paid → CopyTrans Photo
- Wireless transfer via Wi-Fi or Cellular Data, cloud storage
- No app installed, Apple‑only, create albums, but only .JPG photos can be transferred → iCloud.com
- Transfer of photos and videos, simple interface, but paid and impossible to create albums → CopyTrans Cloudly
- No space used on iPhone, easy drag-and-drop, but the photos don’t appear in the Photos app → Google Drive/Dropbox/OneDrive
If you’re looking for the other way around transfer, refer to the article “Transfer photos from iPhone to PC” .
How to transfer photos from computer to iPhone via a USB connection?
How to transfer photos from PC to iPhone with iTunes?
You need to install and launch iTunes on your Windows PC – no need to install anything on your iPhone. Then connect your iPhone to the PC with a cable and select the folder with pics on your PC. To finish it up, sync your iPhone with iTunes.
Here are the detailed steps with screenshots on how to transfer photos from a computer to an iPhone:
- Install the latest version of iTunes from Microsoft Store. Launch it. Download iTunes
- Connect your iPhone to your laptop or computer using a USB or Type-C cable.
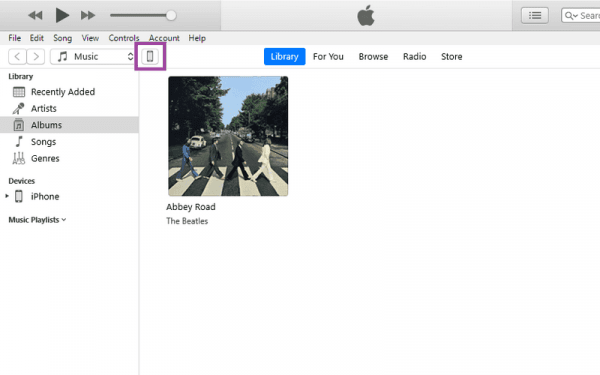
- A phone icon will appear on top of iTunes. Click on it.
- Go to the Photos tab in the left panel.
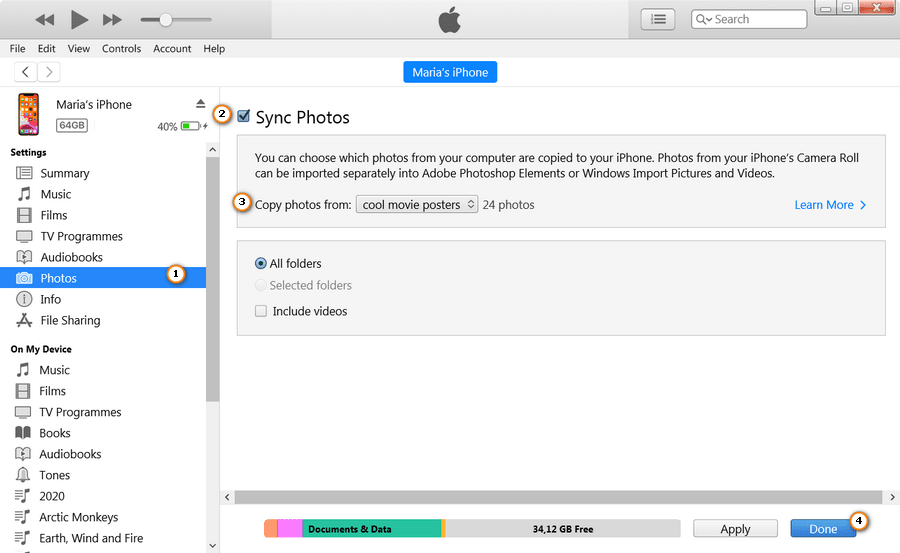
- Check the box next to “Sync Photos” and choose the folder on your computer that you want to transfer.
- Click the “Done” button and wait for the sync to complete.
- That’s all – you transferred photos from your PC to iPhone. You will find them in the “From my Mac” section in the Photos app.
What are the advantages of photo transfer with iTunes?
Manual and Automatic Syncing:
iTunes also offers automatic syncing. Every time your iPhone and PC are connected to the same Wi-Fi, the new photos that you added to the synced folder on Windows will be added to your iPhone as well.
Totally free and Apple-only:
It’s the best option if you transfer photos from your PC to iPhone once in a while and you don’t wish to purchase any app or iCloud storage.
What are the disadvantages of photo transfer with iTunes?
Limited Folder Syncing:
You can only sync one folder at a time. If you decide to change that folder or delete a few pics of the folder that you synced, the previously synced images will be erased from the iPhone.
Photos that are not in Camera Roll are erased:
The photos that were not taken on this iPhone will be deleted for good after the Sync.
No Flexibility:
Once your photos are transferred to the iPhone, you can’t delete or edit them directly on your iPhone. So, you need to delete images in the synced folder on the PC, then sync iTunes and your iPhone again.
If you’re only transferring a couple of photos once in a blue moon, iTunes might do the trick. But if you’re looking for more flexibility, there are better ways. One of those options is CopyTrans Photo. Let’s see how it compares below.
Third-party app to transfer photos from PC to iPhone
CopyTrans Photo
CopyTrans Photo is a Windows app that can copy individual pictures or even a large amount of photos from PC to iPhone. You have to install the app on Windows – nothing is installed on your iPhone. Launch CopyTrans Photo and drag and drop photos from the right panel (your PC folders) to the left panel (your iPhone photo library).
Follow the video instructions or check the steps with screenshots below!
- Download CopyTrans Photo to your PC from the official website. If you need help installing the software, please refer to the installation guide or contact the customer support team. Launch the app. Download CopyTrans Photo
- Connect your iPhone to the PC with a cable. Make sure your iPhone screen is unlocked.
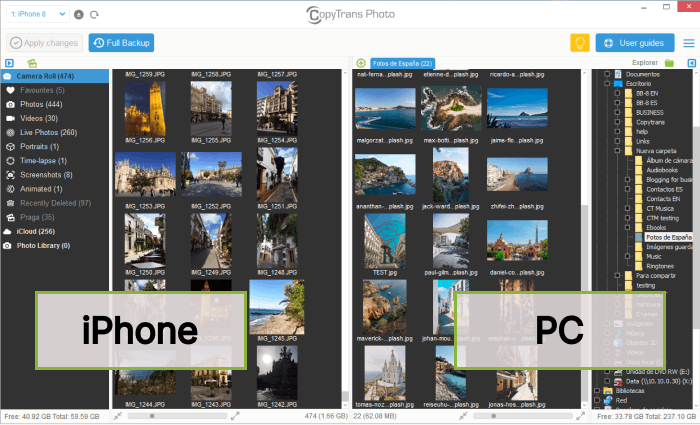
- You will see your iPhone photos on the left and your PC pictures on the right.
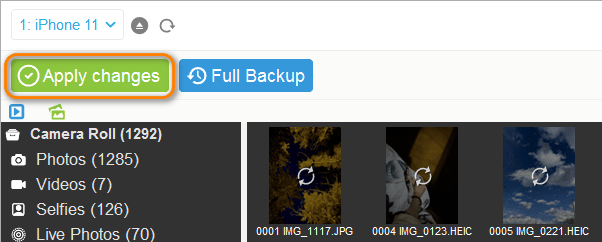
- Open the Photo Library album on the left side. You cannot add pics to the Camera Roll because it’s not an album but a gallery of photos present in your Photos app.
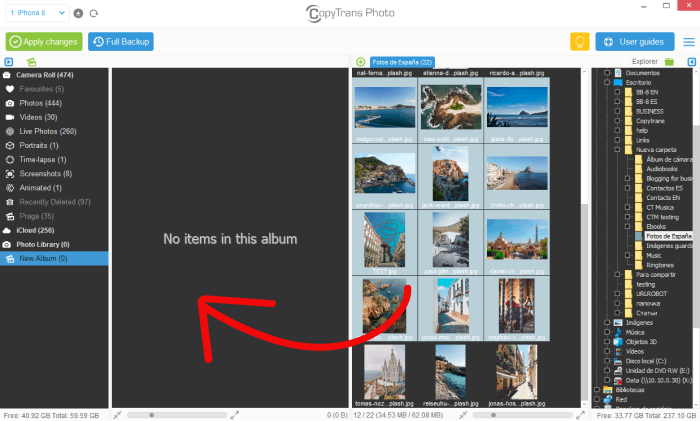
- Using the folder tree on the right PC side, navigate to the PC folder with the photos you want to transfer. Select the pictures and drag and drop them to the left iPhone area.
- Click on the Apply Changes button and wait for the syncing process to complete.
- You got the photos from the PC to your iPhone! You can find them in your Photos app.
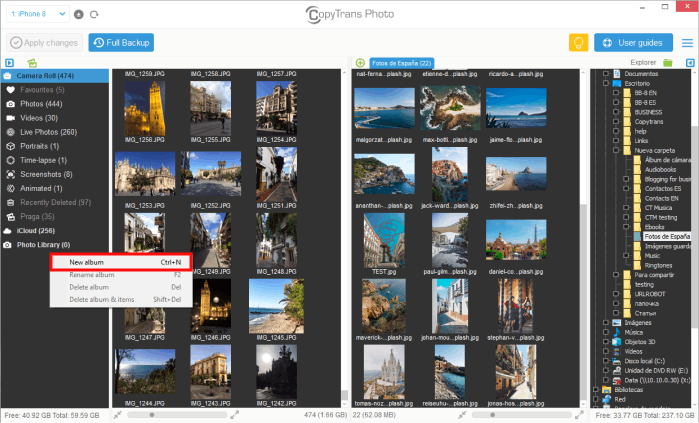
You can also create an album via CopyTrans Photo. If you add photos to it, they will go to the From my Mac collection on your iPhone.
What are the advantages of photo transfer with CopyTrans Photo?
You choose the location:
Add photos and videos directly to your Photo Library or create albums and fill them with files.
English-speaking support, no ads, no hidden fees:
Test the trial version without paying – no need to leave your card details. The customer support answers the mails within 24 hours.
What are the disadvantages of photo transfer with CopyTrans Photo?
Limited actions in the trial version:
You can only add up to 50 photos/videos to your iPhone in the trial version. Good news is that you don’t have to enter card details to use the trial version. So, you can try before you buy. A full version is offered at 19.99 USD for 2 years.
You can’t modify albums that you create via the program:
You can create albums on your iPhone via CopyTrans Photo. However, you can’t delete or edit them on the iPhone. The photos in the albums cannot be modified either. So, you have to delete the pic via CopyTrans Photo or create a duplicate of the album on the iPhone to be able to modify it.
How to transfer files from PC to iPhone wirelessly?
Transfer photos from PC to iPhone via icloud.com
The fastest way
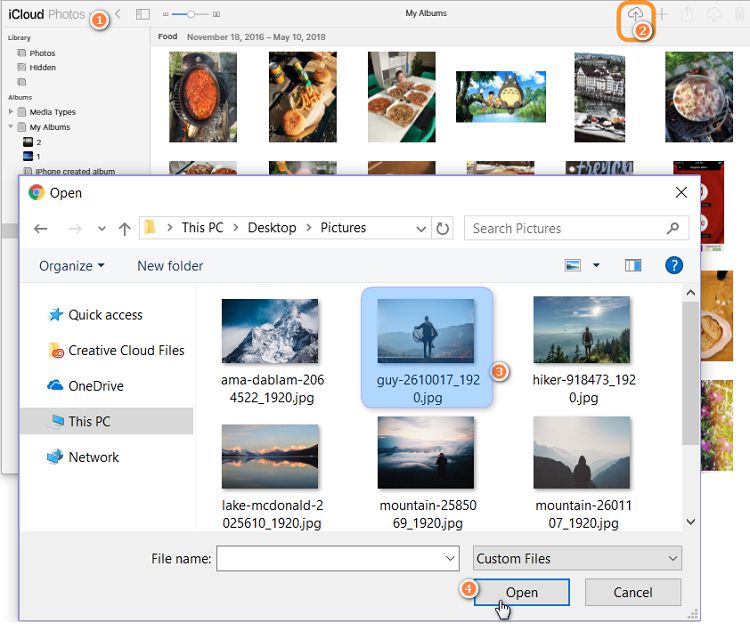
To do so, open icloud.com in a web browser on your PC. Log in to your iCloud account and open Photos from the menu you’ll see. Click on the “Upload photos” button in the top-right corner and select the photos you want to import.
See the detailed steps with screenshots if necessary:
- Go to the official iCloud website icloud.com. You can open the link via any browser on your computer.
- Log in to you Apple/ iCloud account (what is it?). Your iPhone has to be connected to Internet, so that you receive a confirmation. When the 2FA confirmation appears on your iPhone, click on confirm.
- Enter the code that appears on your iPhone screen in the icloud.com window.
- You’ll see the Photos sections – click on it to open.
- You’ll find the upload icon (a cloud with an arrow up) in the upper-right corner. Click on it.
- Select the .JPG/ .JPEG images to upload. You can’t upload other formats via icloud.com.
You can use a free app iCloud for Windows or a paid tool CopyTrans Cloudly to upload photos and videos of different formats. See the article “How to upload photos to iCloud“. - Confirm the selection and wait. Congrats – you uploaded pictures from the computer to your iPhone. The photos should immediately appear in the Photos app if your iPhone is connected to Wi-Fi.
If the photos don’t appear on the iPhone, check if iCloud Photo Library is enabled. Open Settings> Your Name> iCloud> Photos

What are the advantages of photo transfer via icloud.com?
Wireless, no need to install apps:
Just open a browser, access the website and upload photos directly from your folder to iCloud.
Apple-only and free:
That’s an official Apple solution. You can upload up to 5GB of photos for free. But you need to upgrade the storage plan if you exceed the limit.
What are the disadvantages of photo transfer via icloud.com?
Impossible to upload more than 1000 photos in one go:
You have to upload photos in several rounds if you have more than 1000 of them in your PC folder.
One can only upload .JPEG photos:
The website only accepts .JPEG or .JPG pics. Opt for iCloud for Windows or CopyTrans Cloudly to upload videos and photos of other formats (see the steps below).
Transfer large amount of photos and videos of different formats
via CopyTrans Cloudly
Install CopyTrans Cloudly from the official website to your Windows computer. Connect to your iCloud account in it. Click the big “Upload” button. You need a full version to upload more than 100 photos. A 2-year license is offered at 19.99 USD.
Follow the instructions in this video or refer to the detailed steps below:
- Start by downloading CopyTrans Cloudly and installing it on your Windows PC. It doesn’t work on Mac. Download CopyTrans Cloudly
-
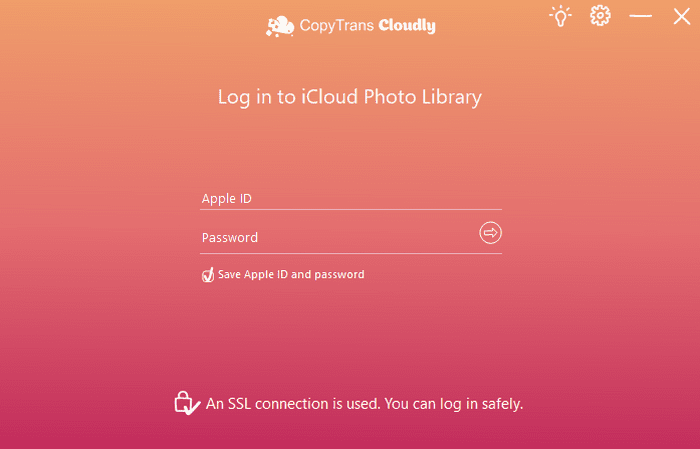
Launch CopyTrans Cloudly and log in with your iCloud credentials. SSL connection guarantees the safety of your personal data.
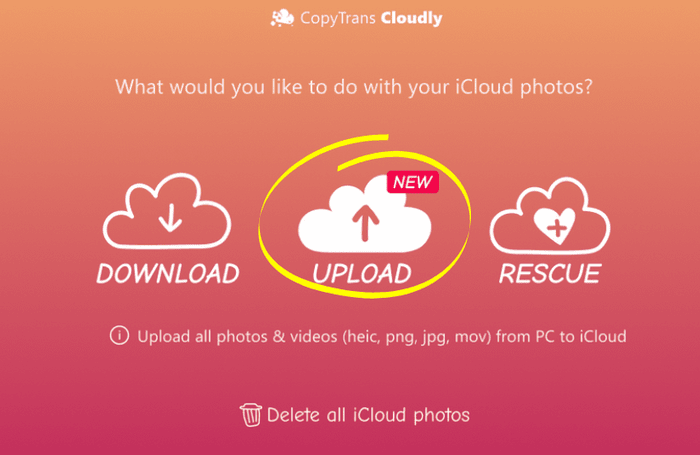
- Select “Upload”.
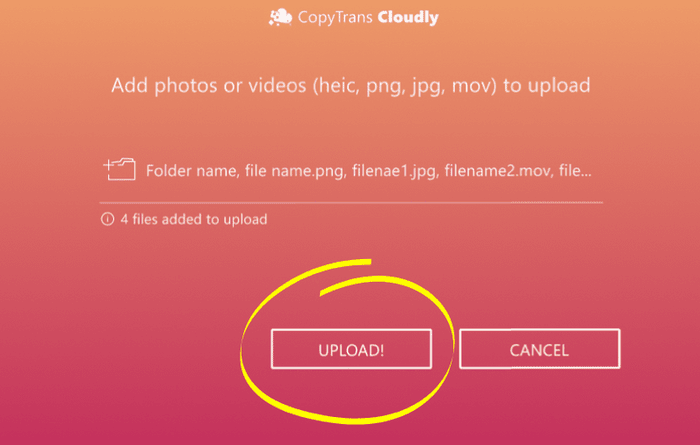
- Select the files you want to upload to iCloud. CopyTrans Cloudly supports .HEIC, .PNG and .JPEG images and .MOV, .MP4, .M4V videos. When everything is selected, click “Upload”.
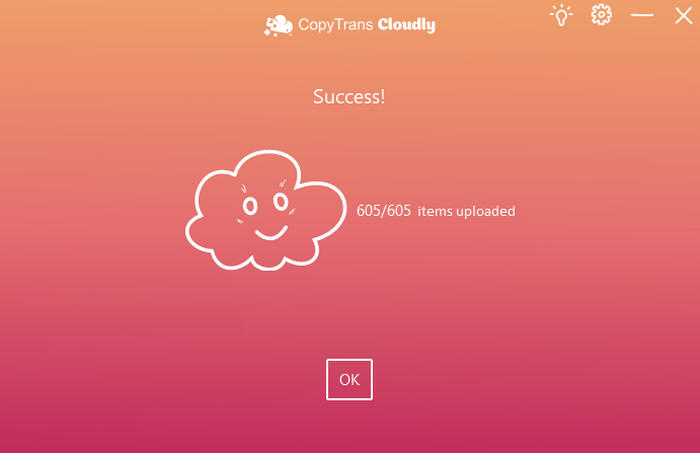
- Wait while CopyTrans Cloudly is doing the job. And that’s it! The pictures are transferred directly to the Photos app on your iPhone. Make sure that iCloud Photos is enabled and your iPhone is connected to the Internet.
What are the advantages of photo transfer via CopyTrans Cloudly?
No limit for the images to upload:
Unlike the official website icloud.com, CopyTrans Cloudly doesn’t limit the upload to 1000 files. You can select more than 1000 photos and videos to add to your iCloud.
Many formats supported:
Select photos and videos of any format to upload to iCloud. However, make sure iPhone supports the file format.
User-friendly interface:
There are only 3 buttons: Download, Upload, and Rescue. So, it’s very convenient if you’re not tech-savvy.
Customer support in English:
If you find and issue, send an email to the customer support. The team replies within 24 hours, even if you don’t have a license yet.
What are the disadvantages of photo transfer via icloud.com?
Not free:
You have to purchase a license to upload more than 100 photos/videos. Hopefully, it’s not a subscription and you can try before you buy. A 2-year license is at 19.99 USD.
Doesn’t work if Advanced Data Protection for the iCloud account in enabled:
Apple introduced an Advanced Data Protection for iCloud to secure users’ data. However, only official Apple tool are able to access the iCloud account if the protection is on. CopyTrans Cloudly cannot bypass the restriction.
How to transfer photos from computer to iPhone
via online storage
If you have a Google account, you are automatically eligible for 15Gb of free storage on Google Drive. However, Google Drive shares this storage space with other apps, like Gmail and Google Photos. Tools like Dropbox or OneDrive also offer free storage – 2Gb and 5Gb respectively.
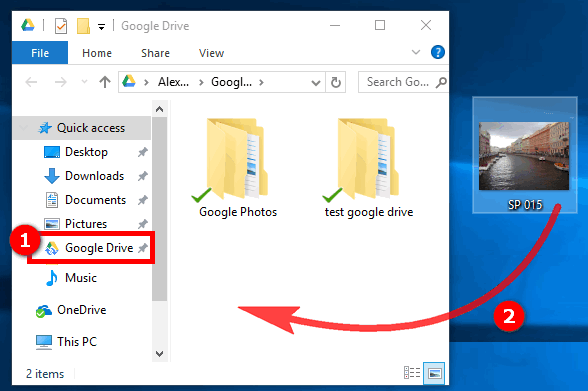
- In order to use this option, you need to download the official Google Drive, Dropbox or OneDrive app on your iPhone.
- Open a web or desktop version of Google Drive, Dropbox or OneDrive on your PC.
- Create a new folder in the interface and copy photos to it.
- The photos will appear in the installed app on your iPhone.
Example of how to drag-and-drop images to Google Drive installed on Windows 10
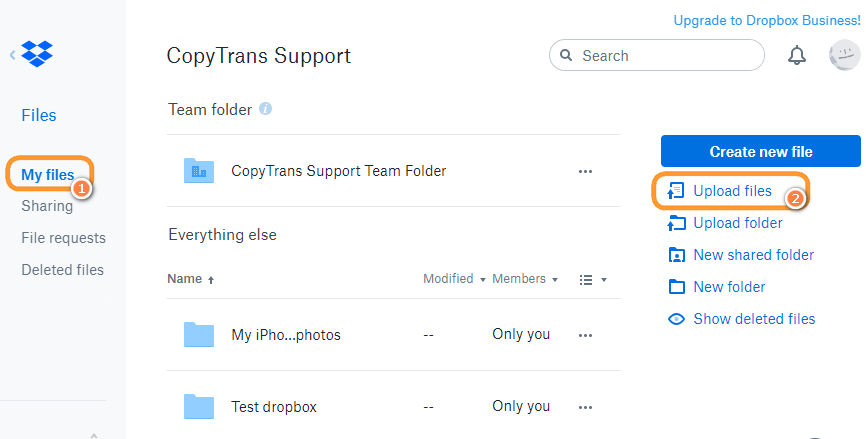
Web version of Dropbox
Example of how to drag-and-drop images to OneDrive installed on Windows 10

What are the advantages of photo transfer via Google Drive, Dropbox or OneDrive?
Free up to a certain GB limit:
You don’t have to buy a subscription if you have a decent number of photos.
Many formats supported:
Upload any photos and video format, but make sure your iPhone supports it.
Easy drag-and-drop:
You simply open the web page and drag-and-drop the photos to the window. The photos appear in the app on your iPhone right after the upload.
What are the disadvantages of photo transfer via Google Drive, Dropbox or OneDrive?
Can change photo format or reduce quality:
It doesn’t always happen, but users report it from time to time.
Photos don’t go the native iPhone Photos app:
The photos that you transfer stay in the Google Drive, Dropbox or OneDrive app on your iPhone. You can manully select and download them to the Photos app.
Conclusion: How to transfer photos from PC to iPhone?
Refer to the comparison table below to compare all the options described above. The key is to find the method that works best for you and your devices. If you don’t trust cloud solutions, find iTunes hard to use and want to keep your photos in the native Photo app, CopyTrans Photo will be the best option (see the steps and download above).
What is the best way to transfer photos from PC to iPhone?
| App | NB | Difficulty | Steps |
| iTunes | Erases photos outside Camera Roll | Difficult | Install, navigate in the app and sync |
| CopyTrans Photo | Works without iCloud and without replacing Photo Library | Medium | Download, install and drag-and-drop photos |
| icloud.com | Can make albums and fill them with pics wirelessly | Easy | Log in and upload photos |
| CopyTrans Cloudly | Adds photos directly to Photos app if iCloud Photos is enabled | Medium | Download, install, log in and upload photos |
| Google Drive, Dropbox or OneDrive | Photos are not copied directly to Photos app | Medium | Install app on iPhone, log in on PC, drag-and-drop photos on PC, download photos on iPhone |
FAQ: PC to iPhone Photo Transfer
What apps allow transferring photos from PC to iPhone without data loss?
iTunes, CopyTrans Photo can copy over photos from PC to iPhone without losses. If you use iCloud, opt for iCloud for Windows or CopyTrans Cloudly.
How to transfer photos from computer to iPhone via a USB connection?
You can use a special USB-drive and transfer the photos that way. Otherwise, connect your iPhone to a Windows PC and use iTunes or CopyTrans Photo to add photos to your iDevice.
Can I AirDrop photos from laptop to iPhone?
No, it’s impossible. Neither Bluetooth nor AirDrop work between a Windows computer and an iPhone. You can use either Google Drive, Dropbox, OneDrive for wireless transfer or iTunes and CopyTrans Photos for wired transfer.
iPhone not showing up on PC
Please make sure your iPhone screen is unlocked. If it is, but the iPhone is still not recognized, install iTunes or necessary drivers. It’s easy – follow the steps.
Why don’t my transferred photos appear in the Photos app?
If you’re using online-storage-apps like Google Drive, Google Photos, OneDrive, Dropbox, the transferred photos stay in the app. You will have to manually select and download them, so that they appear in the Photos app. If you add photos via iCloud, make sure photos are synced in the device settings.
How to transfer HEIC photos from PC to iPhone?
CopyTrans Photo supports different photo and video file formats including HEIC. Install CopyTrans Photo on your Windows PC and drag and drop the HEIC photos to the Photo Library album.
How do I avoid replacing existing photos when syncing?
If the photos have different names and metadata, they will not be replaced. However, if you want to be sure that no photos are damaged, transfer photos via CopyTrans Photo instead.
Does iTunes overwrite my existing photo library?
No, it doesn’t. But it can delete photos that are not part of your Camera Roll (the photos that you took with the phone). To avoid any overwriting, add photos to your iPhone via CopyTrans Photo.