

 (9 votes, average: 3.78 out of 5)
The iPhone has undoubtedly become an essential part of our everyday lives, serving as a communication tool, a source of entertainment, and a personal assistant all rolled into one. However, like any other device, iPhones are not immune to technical glitches. One such error that can frustrate iPhone users is the dreaded Error 4013.
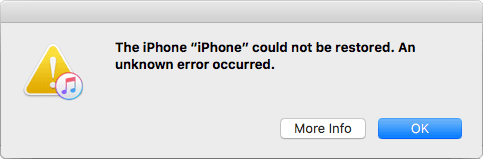
Error 4013 is an issue that often occurs during software updates or restores on iPhones. If you try to update your iPhone’s operating system or restore your device using iTunes, you may recieve a message: “iPhone won’t restore“. This error can prevent the update or restore process from completing successfully, leaving you stuck with an unresponsive or bricked device.
In this article, we will look into the details of iPhone Error 4013, exploring its causes and potential solutions. Whether you are a tech-savvy individual or simply an iPhone user seeking guidance, this troubleshooting guide aims to help you to resolve the problem and get back to using your device smoothly.
So, if you find yourself facing the iPhone Error 4013, don’t panic! This article will equip you with the knowledge and tools necessary to troubleshoot this error and bring your iPhone back to full functionality. Let’s dive in and get your device up and running again!
- Error 4013, 4014, 9 or 5 | Troubleshooting
- iPhone won’t restore | Extract the data to PC
- BONUS: Transfer photos and contacts back to iPhone
Error 4013
What causes error 4013
iPhone Error 4013 can occur due to various reasons. Here are some of the common causes:
- Hardware Issues: One of the most common causes of iPhone could not be restored error 4013 is related to hardware problems. This can include issues with the iPhone’s ports, cables, or even the logic board. Faulty or damaged hardware components can interfere with the update or restore process and trigger the error.
- Software Conflicts: Error 4013 can also be caused by software conflicts between the iPhone and the computer being used for the update or restore process. It is important to have the latest version of iTunes installed on your computer, as outdated software can lead to errors.
- USB Connection Issues: In some cases, a faulty USB connection can trigger Error 4013. Issues with the USB cable or the computer’s USB port may interrupt the data transfer during the update or restore process.
- System Settings: Certain system settings on the iPhone or computer may interfere with the update or restore process and result in Error 4013. For example, security software, firewall settings, or third-party software can sometimes obstruct the communication between the iPhone and the computer.
Now, as we understand the basic reasons of this error, let’s look into the troubleshooting steps. Keep reading the article
iPhone error 4013 solution
As we discussed all the possible causes above, we are ready to resolve the issue and make evrything we can to never get this Apple error 4013 again! Before assuming that the iPhone backup is corrupted, please follow the simple steps below.
1. Restart your iPhone and PC
First things first: try restarting your iPhone and your PC. Surprisingly, it helps in a number of cases when iPhone cannot be restored.
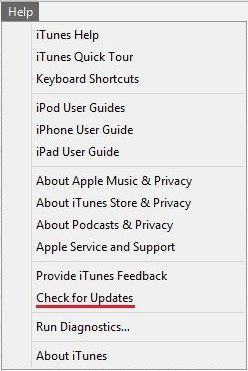
2. Update iTunes to the latest version
Updating iTunes may be useful when you get an error message that says “iTunes could not back up the iPhone because the backup was corrupt or not compatible with the iPhone”.
- Launch iTunes
- Choose the Help section of the menu
- Click “Check for updates”. If there is a later version of iTunes, the update process will start automatically.
Alternatively, you will get a message “This version of iTunes is the current version”.
If you downloaded iTunes from Microsoft Store, it will update automatically upon the release of a new version. To make sure you get the latest updates, manually check the Store for iTunes updates.
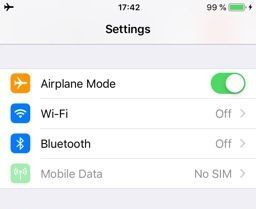
3. Switch to airplane mode
Sometimes your iPhone won’t restore because it thinks iCloud restore is in progress. Switching to airplane mode will minimize the risk of errors. To enable airplane mode, go to Settings → Airplane mode (can be found under your Apple ID).
4. Change your lightning cable
Please check if the lightning cable that you’re using is MFi certified (meant to be used with iPhone / iPad / iPod). MFi certified products have the following logo on the package:
![]()
If you use a non-MFi certified cable, backup or restore problems may occur. Please remember that it is always better to use Apple-compatible products while transferring data.
If the cable you are using is MFi certified, make sure that it is not damaged. Here’s one example of what it should not look like:
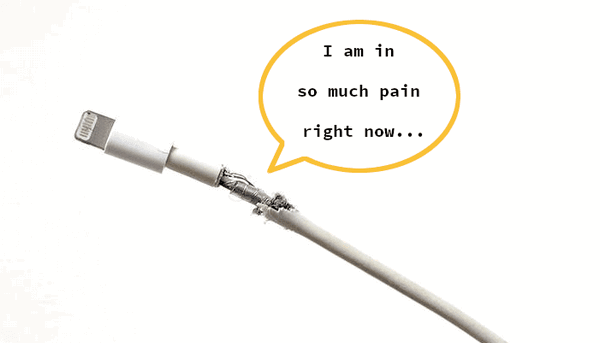
If possible, try using a different cable in any case.
5. Restore using another USB port or another computer
After checking the condition of the USB cable, check your USB port for failures. To do so, connect your lightning cable to another USB port.
If you have a chance, try restoring your iPhone on a different computer to rule out problems with your PC. To do so, transfer iPhone backup to another computer using an external drive, local network or NAS. Don’t know where your backup files are? Use CopyTrans Backup Extractor.
6. Double-check the passcode
Unlocking is necessary when backing up and restoring iPhone. Check whether the entered passcode is correct. If can’t restore iPhone because of password issues, see the Apple’s official article. Also, in certain iOS versions there may be issues with backup and restore processes unless your passcode is completely switched off. See how to disable your passcode.
7. Check your antivirus
If difficulties occur in the process or at the end of restore or your device is not recognized, try disabling antivirus until the restore procedure is complete. For more information on interaction between iTunes and security software, see Apple’s guide.
Tried it all and still can’t take control over your backups? The next part of our article is about dealing with backups that went rogue.
If you have an Error connecting to Apple ID server please follow the steps in our guide to fix the problem.
iPhone won’t restore
Extract the data to PC
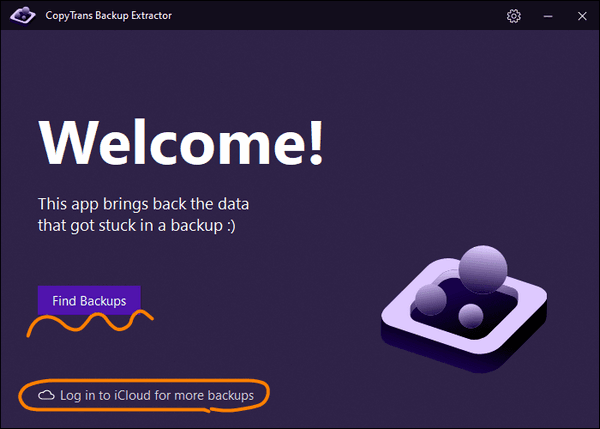
If the steps above didn’t help, the backup is probably damaged, meaning you can’t restore from it. But there might still be a chance to save the data! For this, we offer our own program – CopyTrans Backup Extractor.
You may still save your data with CopyTrans Backup Extractor, which will:
Advantages of CopyTrans Backup Extractor
- Extract data from any backup to your PC
- Find all the backups automatically (FREE feature)
- The free version allows you to see what a backup includes
- Compatible with different backups: iCloud, iTunes, CopyTrans Shelbee
Here is what to do when you can’t restore your iPhone:
-
Download and install CopyTrans Backup Extractor:
Download CopyTrans Backup Extractor
- Run the program. If you want to access iCloud backups as well, log in to iCloud as shown in the screenshot. Once ready, click on “Find Backups”.
-
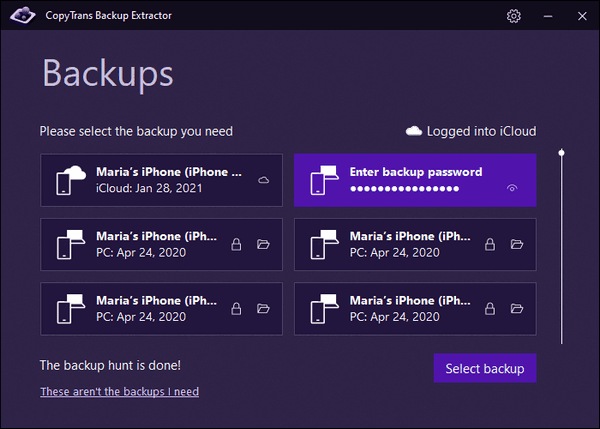
After a while, you will see the list of all the backups available to you on PC or in iCloud.
Choose the one you need. You may be asked for a backup password. What password?
☁️ iCloud backups will be marked with a cloud icon and they are never password-protected.
- Choose the type of data you need or select “Extract everything”. You will be asked to select the destination folder.
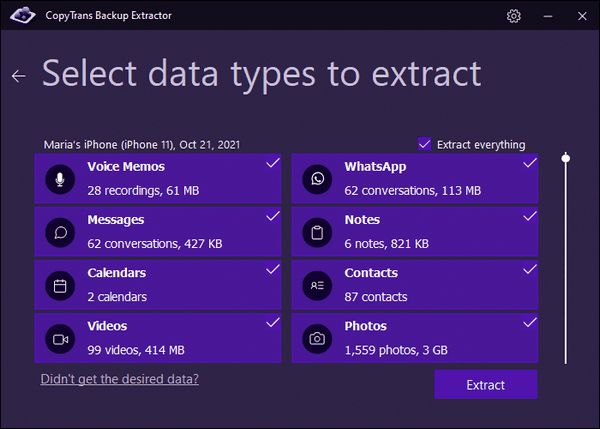
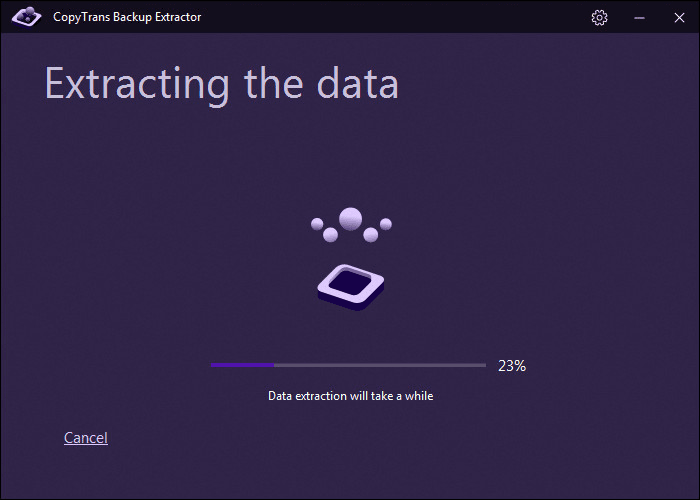
- Wait for the iPhone data extraction to complete.
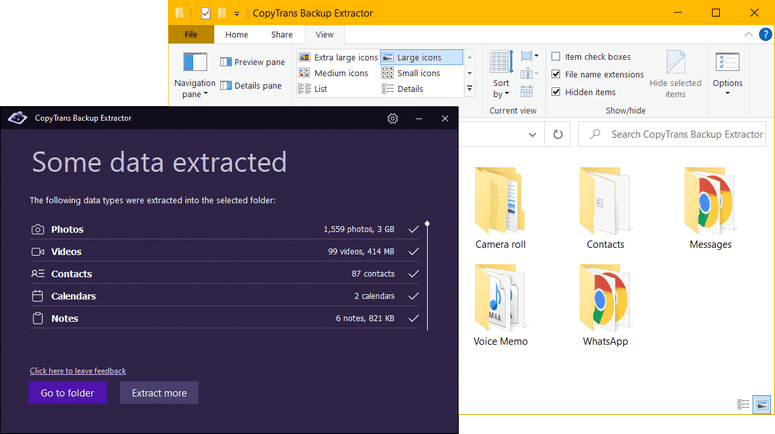
- CopyTrans Backup Extractor rescued everything it could from the backup!
If you need help installing the program, refer to the installation guide.
With any luck, you’ve now combated iTunes error 4013, 4014, 9 or 5. If you would like to transfer the extracted pictures, contacts or other types of data to your iPhone now, we know how to help you.
Transfer photos and contacts back to iPhone
After you’ve extracted data from a corrupt iPhone backup to PC, you can transfer part of it back.
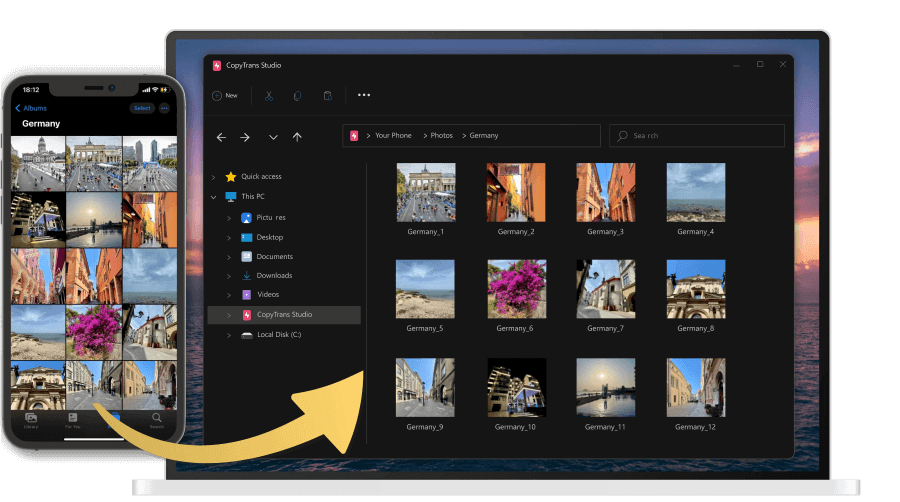
Use CopyTrans Studio to transfer photos to iPhone:
Why people choose CopyTrans Studio:
💥 Introduces a convenient way to manage photos and videos on your iPhone from PC;
💥 Transfers photos and videos from iPhone and PC preserving the original quality and EXIF data;
💥 Copies photo albums preserving the album structure;
💥 Works offline;
💥 Compatible with the latest iOS, and Windows versions;
Try CopyTrans Studio for free!Use CopyTrans Contacts to transfer contacts to iPhone:
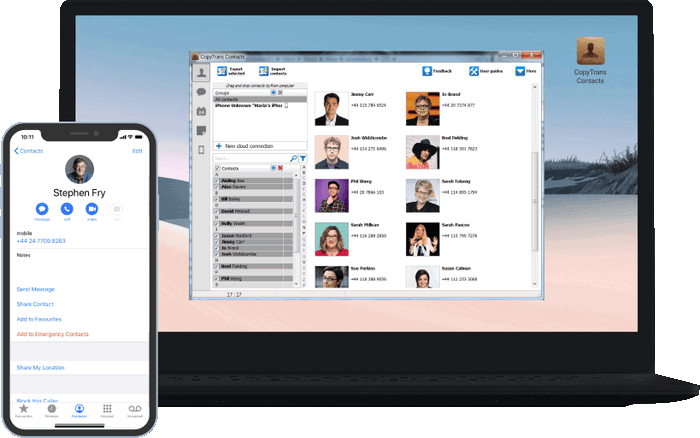
Why people choose CopyTrans Contacts:
💥 Save contacts in a few clicks;
💥 Work with different formats: .xlsx; .vcf; .csv;
💥 Manage all iPhone, iCloud, Outlook and Gmail contacts;
💥 Transfer iPhone messages to PC in different formats;
💥 Manage iPhone and iCloud calendars;
💥 Easy-to-use, intuitive interface.
See CopyTrans Contacts!This is all for dealing with a corrupt iPhone backup! To avoid iPhone error 4013 in the future, make sure to make a properly validated backup.