Normally, when asked how to transfer photos from iPhone to iPhone, everyone thinks of iCloud. But not everybody knows that using iCloud for this task has several pitfalls:
🔸 You can only sync the whole photo library to another device;
🔸 Part of your photos will be stored on your older device and part in iCloud;
🔸 If you choose to unsync photos, they may be removed from your device;
🔸 You won’t be able to trim and organize your library, leaving only relevant photos.
To take control over what photos you transfer and where they are stored, you need to take a longer route. Don’t worry though, the steps are pretty easy!
Here is how to transfer photos from iPhone to iPhone without iCloud:
1. Transfer photos from the old iPhone to PC and clean your library.
2. Transfer photos from the PC to a new iPhone.
3. Import all the photos to Camera Roll.
⚡ Use this to save iPhone photos in any possible way >>
How do I transfer photos from iPhone to iPhone
Transfer photos from iPhone to PC
For Step 1 we need to move pictures from your old iPhone to the PC. To transfer photos from old iPhone to new iPhone, we will use our offline photo management tool, CopyTrans Photo. It allows you to transfer ALL of your iPhone pictures to the computer in 1 click.
Why do people choose CopyTrans Photo?
⭐ Lets you choose what photos and albums to move to another device;
⭐ Transfers photos and videos between iPhone and PC preserving the original quality and EXIF data;
⭐ Preserves the original album structure;
⭐ Works offline;
⭐ Works with HEIC, ProRAW, and Live Photos;
⭐ Compatible with the latest iOS and Windows versions.
So, here is how to transfer photos from iPhone to computer by pressing only one button:
-
Download and install CopyTrans Photo.
Get your iPhone photos to the PC
If you need help installing the program, please refer to the installation guide.
-
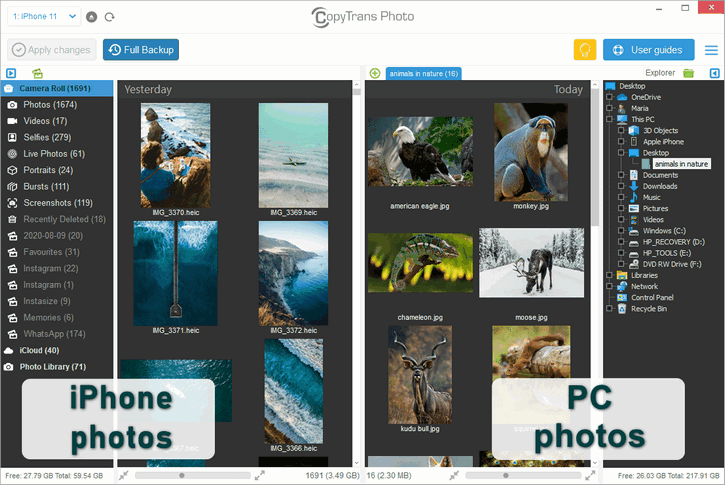
Run CopyTrans Photo and connect your device to the computer. iPhone or iPad photos will be displayed on the left-hand side of the main program window. Your PC folders will appear on the right.
-
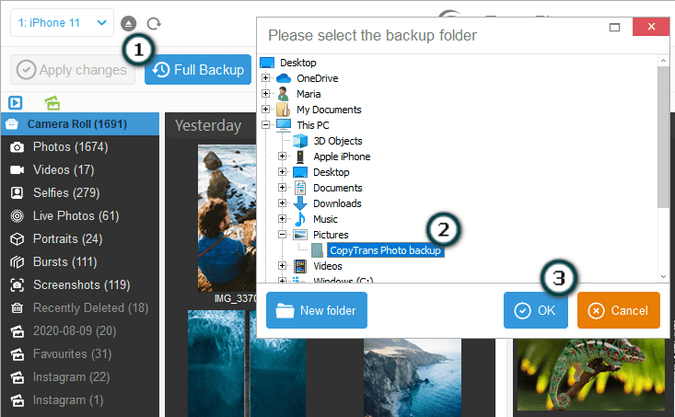
To download all iPhone photos and albums at once, click Full Backup in the top-left corner, then select the destination folder and hit OK.
-
Wait until the backup is complete.

-
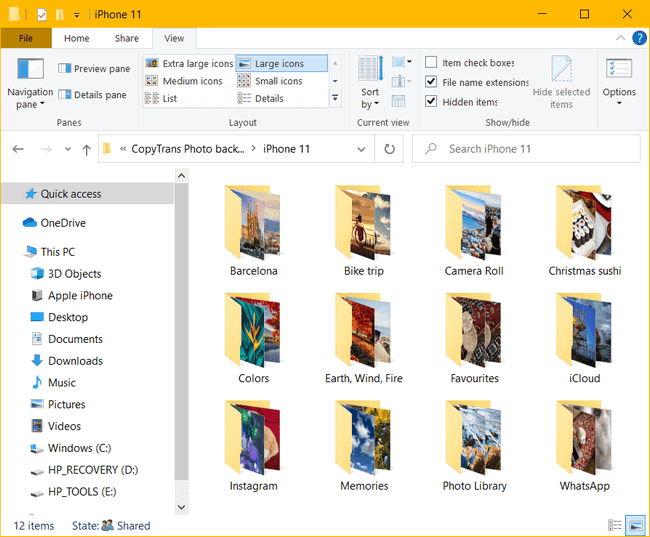
Done! If you want to, you can trim your library by getting rid of the images you don’t like.
Transfer photos from iPhone to iPhone
Transfer photos from PC to iPhone
For Step 2 we will import photos from the PC to the second device using the same handy tool, CopyTrans Photo.
-
Start CopyTrans Photo and connect your new iPhone (iPad or iPod touch) to the PC.
-
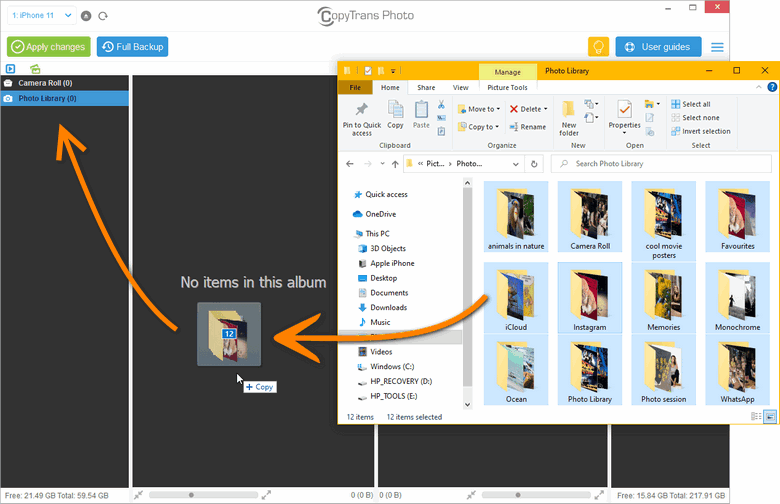
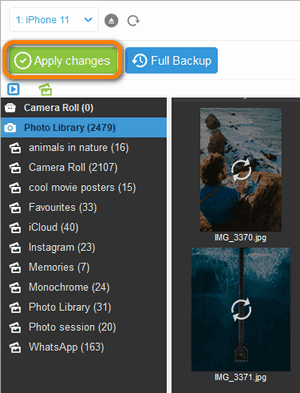
Select all the PC albums exported with CopyTrans Photo in Part 1, then drag and drop them to the left-side panel of the interface under the Photo Library section.
-
Your albums will populate the Photo Library. Click Apply changes to save photos on the device.
-
The photos now reside on your iPhone!

Here is more on the subject from Apple.
How to transfer photos from old iPhone to new iPhone
Add photos to Camera Roll
For Step 3… Hold on a second, why do we even need to manually move photos from Photo Library to Camera Roll?
Apple designed the iPhone, iPad and iPod touch Camera Roll (Recents in iOS 13 and above) to only contain photos and videos you take with the device. This is why it is not possible to add photos or videos from elsewhere directly to Camera Roll or its photo albums.
So, let’s move photos from the Photo Library to Camera Roll. We are almost there!
-
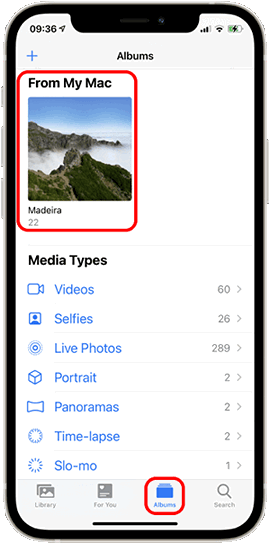
On your iPhone, go to Photos > Albums > From My Mac, then select the album with the photos you need to copy to the Camera Roll.
-
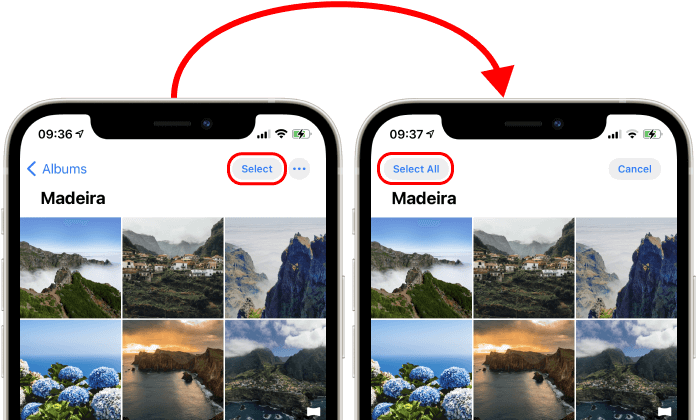
In the upper-right corner, press Select and choose the photos you need. There is also the Select All option.
-
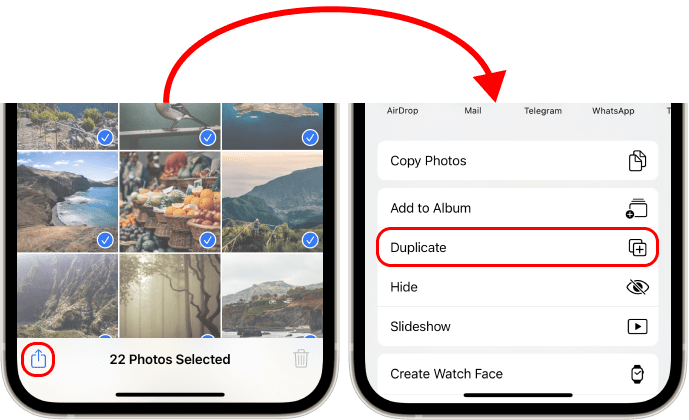
Then select the Share option in the lower-left corner of the screen and choose Duplicate to copy the photos to the Camera Roll.
-
The photos are now part of your Camera Roll.
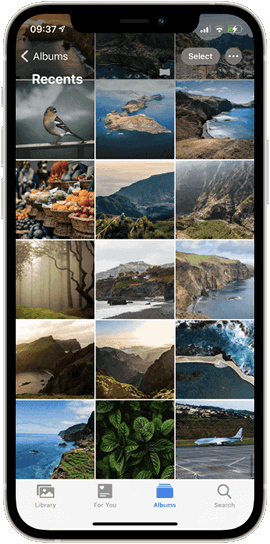
Duplicating photos will copy them to Camera Roll (Recents). But if you want to keep the exact album structure, do this: go to an album under the From My Mac section and click Select > Select All > Share button in the bottom-left corner > Add to Album > New Album. Name the album the same as your folder is named. Now you have an editable album in your Camera Roll! -
Do not forget to delete the photos from Photo Library to avoid duplicates! Just use CopyTrans Photo again. Here’s a separate guide on How to delete photos from iPhone just in case.
And this is how you can transfer photos from old iPhone to new iPhone without iCloud. Hope we could help you out! If you have questions, shoot us a comment below.
