
 (4 votes, average: 4.75 out of 5)
We are all concerned about the security of our data, which is why we prefer to keep our photos on different devices very important. iCloud, Apple’s cloud storage service, offers a convenient solution to synchronize and access photos on Apple devices. However, problems with photos not uploading to iCloud can be frustrating and disrupt the smooth synchronization of your photo library.
In this troubleshooting guide, we’ll look at common issues users face, including photos not syncing to iCloud, difficulty adding photos to iCloud, and problems syncing photos to iCloud. We’ll cover practical solutions and step-by-step methods to fix these issues, ensuring that your photos are securely stored and easily accessible on all Apple devices. Let’s uncover the mysteries behind why photos won’t upload to iCloud and help you effectively manage your photo library in the iCloud ecosystem.<7p>
By breaking down these troubleshooting techniques, we aim to simplify the process of managing your photo library, ensuring that you can fully utilize the convenience of iCloud without the frustration of not being able to upload photos. If your iCloud is not uploading photos, see what we’ve got below!
- Why is Syncing with iCloud paused
- Troubleshooting tips
- Alternative options recommended
- How to unpause syncing with iCloud: FAQ
Syncing with iCloud paused
Reasons why
When we face any problem, we always want to know why is there an issue? We found several possible causes:
-
Insufficient iCloud Storage:
When you have no space in iCloud, then it is impossible to save photos there. So an automatic syncing function is automatically disabled. It is a basic rule to regularly monitor your iCloud storage and upgrade it if necessary.
-
Connectivity Issues:
One of the main reasons why is syncing with iCloud paused is an unstable or unreliable internet connection. Doesn’t metter if you are using Wi-FI connection or mobile data, if the cinnection interrupts, then the syncing process stops.
-
Server and Maintenance Issues:
Sometimes Apple updates and maintenances iCloud servers and its infrustructure, and it may impact an uploading process. While these instances are usually brief, they can cause some problems.
-
Software Glitches and Incompatibilities:
The complex interaction of software components in the Apple ecosystem sometimes causes bugs and incompatibilities that prevent photos from uploading to iCloud. Outdated versions of software, including updates to iOS and the iCloud app, can cause these kind of bugs.
Now when you know why does it say syncing with iCloud paused, we will show you how to fix the issue.
iCloud photos not uploading
Upload photos to iCloud
using CopyTrans Cloudly
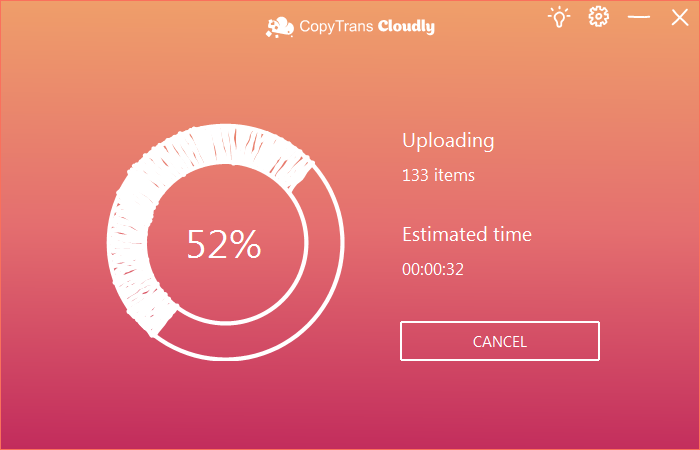
If you already have photos on your PC, combating syncing issues is a child’s play. We developed an instrument called CopyTrans Cloudly that will help you upload your photos in a few simple steps. You will be guided by the app’s user-friendly interface: CopyTrans Cloudly is always glad to see you and does not want you to get confused!
💗 What CopyTrans Cloudly can transfer for you:
Videos: upload MOV, MP4, M4V files to iCloud;
Photos: upload HEIC, JPEG, PNG images to iCloud in great numbers;
👍 After you’ve uploaded your files to iCloud, you can move or delete them from the PC folder – they will still be available in iCloud.
Here is what to do:
-
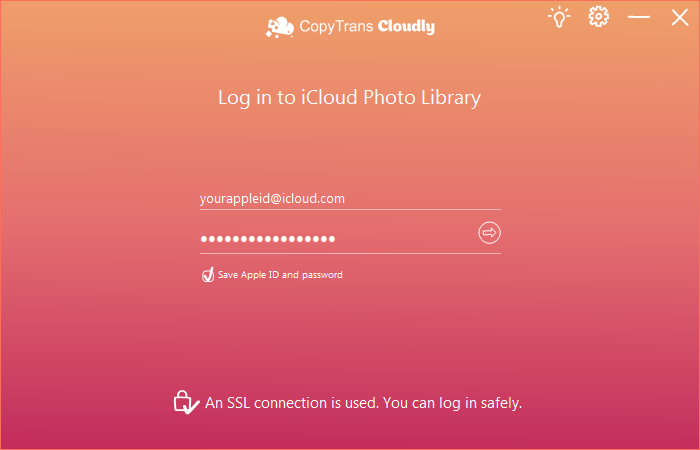
Download, install and run CopyTrans Cloudly. If you need help, refer to the installation guide.
Download CopyTrans Cloudly -
Sign in with your Apple ID. We use SSL connection to protect your data, so you’re safe!
-
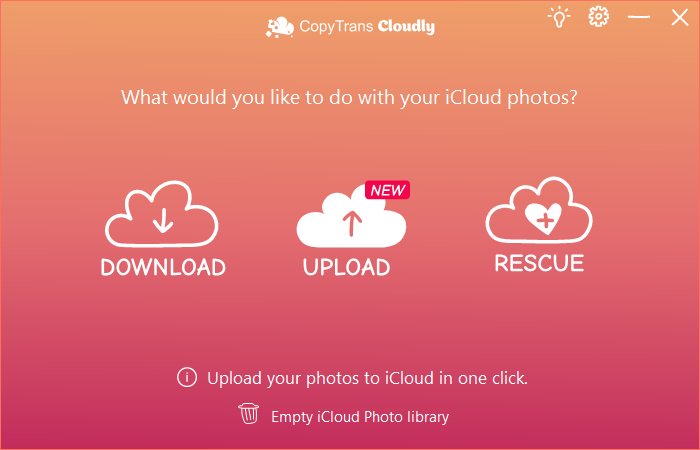
On the welcome screen, choose “Upload”.
-
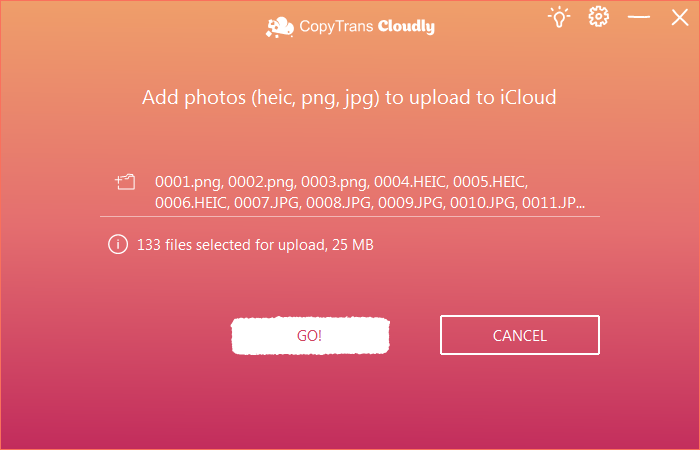
Select the files you want to upload to iCloud.
Once you’re ready, press “Upload!” -
Wait until the program carefully delivers your photos to your iCloud account… There they are.
-
Your photos sit tightly in your iCloud. If your device is synced to iCloud, the photos will appear on it as well. Thank you for using CopyTrans Cloudly!
⚡ If you’re using a trial version of the app, you can upload the first 100 photos for free and see how it works out for you. No automatic charges! We allow trial actions so that you can get acquainted with Cloudly’s style and benefits.
CopyTrans Cloudly also can:
-
Rescue your permanently deleted photos from Apple servers.
-
Download all iCloud photos to PC in one go.
-
Delete all iCloud photos if necessary.
YouTube guide
How to unpause syncing with iCloud
Troubleshooting tips
If you are not in a hurry, try a couple of steps to make your iCloud alive and well again. Here is what you can do to upload photos to iСloud by potentially improving its well-being.
These troubleshooting steps will also prove helpful in case you faced the “Uploading to iCloud paused” issue. In most cases it it caused by poor internet connection and low battery. If that is nothing of the sort, follow our lead to fix uploading to iCloud paused.
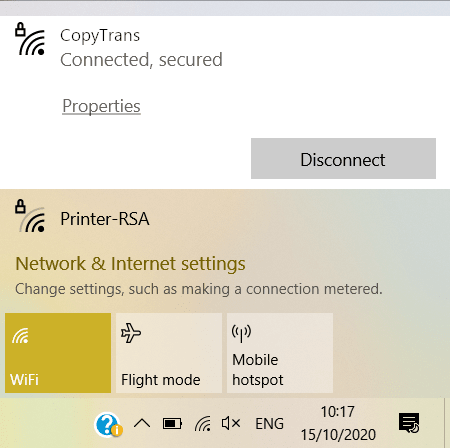
1. Check the internet connection
If your network connection is unreliable or experiencing issues, iCloud might refuse to play with you. To avoid the iCloud photos not loading issue make sure that your Wi-Fi is up and running and you have stable access to the internet. Reconnect to your WiFi just in case.
On iPhone: See the quality of connection in the upper part of your screen. Or, swipe down the right side of the screen to bring up the control panel: it will show you whether you have WiFi connection and Mobile Data enabled.

On Windows: Click on the WiFi icon in the lower right corner of the screen. You will see the status of your WiFi connection.
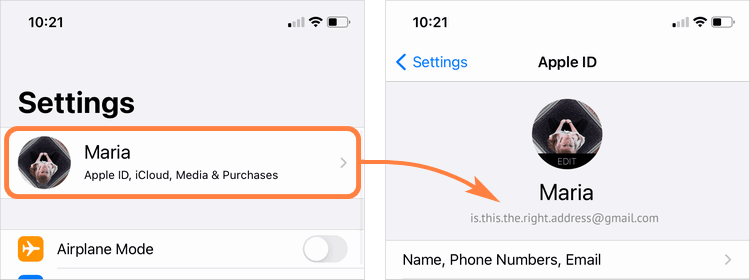
2. Make sure your Apple ID is correct
Maybe iCloud is not at fault, after all… Check that your credentials (Apple ID and password) have been entered correctly. If not, it might be worth the effort reentering them.
On iPhone: open Settings -> Apple ID -> Check the email address displayed under your name.
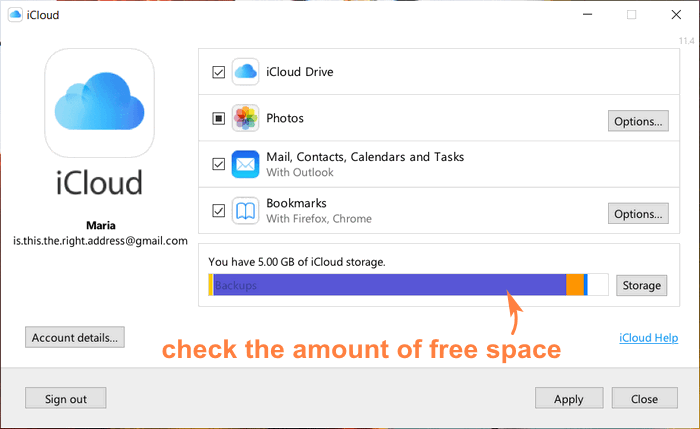
On Windows: Launch iCloud for Windows. Once signed in, you will see your name and email address under the iCloud logo.
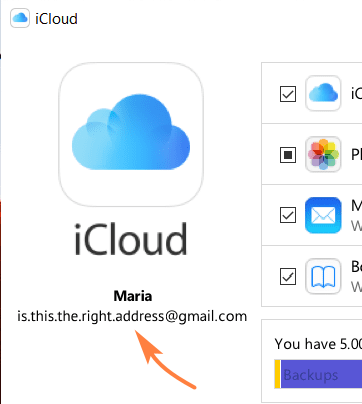
In the same window, you can make sure iCloud Photos is enabled on your PC.
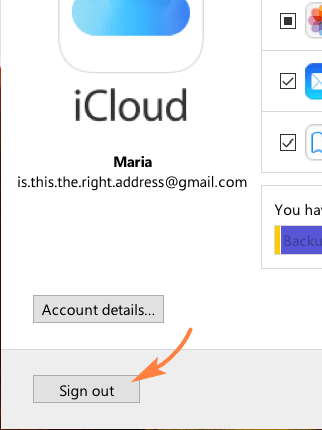
3. Reconnect to iCloud
In case of iCloud photos not uploading sometimes the syncing glitches are just plain mood swings: iCloud is feeling grumpy and taking it out on you. Try turning it off and on to see if it improves the service’s disposition.
On iPhone: Go to Settings -> your Apple ID -> iCloud -> Photos -> Toggle the switch next to iCloud Photos off and on again.

On Windows: open iCloud for Windows. In the lower left part of the screen, you will see the button “Sign out”. Once you’ve clicked it, you will be taken to the sign-in screen again. This is a bit of a merry-go-round, but it may help.
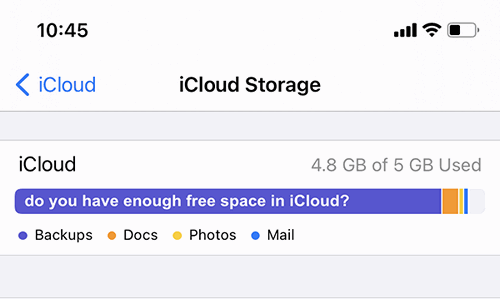
4. See how much iCloud storage you have
There is another reason for you to ask “Why aren’t my photos uploading to iCloud?” It could be that iCloud just can’t handle the pressure you’re putting on it, i.e. doesn’t have enough storage. If this is the case, clearing some contents may get you back in iCloud’s good graces.
On iPhone: Go to Settings -> your Apple ID -> iCloud -> Manage Storage. You will how much free space you have and what takes up most of your space. If you’re lacking storage, see our tips on how to free up iCloud space.
On Windows: In iCloud for Windows, sign in to your profile to see a report on how you’re doing storage-wise. From this screen, you may opt to delete part of the data (Click “Storage” to see all data types available for cleanup).
If you are wondering Is iCloud for Windows really as good as Apple says it is? Then read the article and find it out!
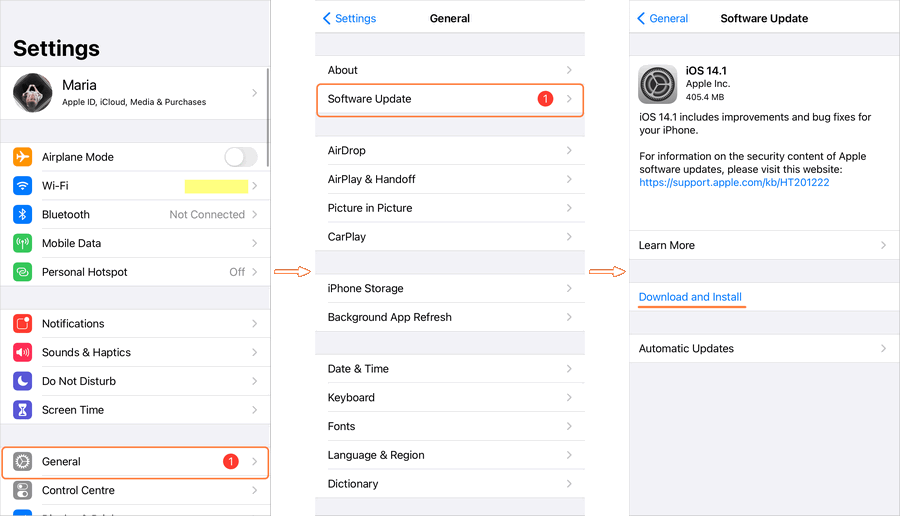
5. Update your iOS version
This tip is for iPhone users providing that photos wont upload to iCloud. On your iPhone, go to Settings -> General -> Software Update -> see if you have any updates available.
If you’re a real diehard, you can also restore your device from a previous backup to try and get back past the point where it all went wrong.
iPhone photos not uploading to iCloud
After performing the troubleshooting steps | What do I do?
If troubleshooting got you nowhere and you are still unable to upload photos to iCloud, you may consider other means to achieve your goal. We have a couple of tricks up our sleeve. If you are willing to give it a try, choose your scenario:
Back up photos to your PC using CopyTrans Photo
It is quite possible that you checked your iPhone one day and your photos just won’t upload to iCloud. If that’s how things stand, we can help you upload your photos both to PC and to iCloud. For this, we developed two tools, called CopyTrans Photo and CopyTrans Cloudly.

💙 What CopyTrans Photo can do for you:
▪ Transfer photos in HEIC, bmp, gif, jpeg, jpg, dng, tiff, tif, tga, png, pcx, dng (ProRAW);
▪ Convert HEIC to JPEG Windows 10, 11, also 8.1, and 7;
▪ Choose the format: HEIC, JPEG or both;
▪ Transfer photos from PC to iPad or iPhone preserving the original quality and EXIF data;
▪ Copy photo albums back and forth, preserving the album structure;
▪ Work offline.
❤ We currently have a great deal – you can get 75% off CopyTrans 7 Pack. It’s cheaper than buying just two programs 😉
Here is what we suggest:
-
First, back up your photos to PC. To begin, you will need CopyTrans Photo:
Download CopyTrans Photo -
Download, install and run the program. If confused, see the installation guide.
-
On your iPhone, go to Settings -> iCloud -> Photos and select Download and Keep Originals. Then, turn off iCloud photos.
-
After that, connect your device to PC. You will see a window with two panes: the device pane on the left and the PC pane on the right. The leftmost and rightmost sections are navigation panels.
-
Select the device photos you want to transfer and drag-and-drop them to the area on the right.
-
Click on “Apply changes” and wait for the photos to be transferred.
-
You’re awesome! And to prove that, you now have all your photos on your PC hard drive.


NOTE: If you want your entire library transferred, opt for Full backup. This will save you time selecting all your photos.


Now you are ready for Step 2: uploading photos from PC to iCloud. Jump to the section with CopyTrans Cloudly to learn how to upload pictures to iCloud.
We recently released an updated version of our tool for backing up and transferring photos from your iPhone — CopyTrans Studio.
With CopyTrans Studio, you no longer have to worry about import failures, lost photos, or limited iCloud storage space. The program creates fast, reliable, and wireless backups of your entire photo and video library – right to your computer.
Why you’ll love the new CopyTrans Studio:
- Transfer photos and videos over a Wi-Fi network, without cables
- Create full backups of your iPhone photo library in one click
- Set up automatic scheduled backups and let the program do all the work for you
- Take advantage of Windows Explorer integration: view your iPhone photos as regular folders
- Fully compatible with the latest iOS devices and updates
How to unpause syncing with iCloud
FAQ
Why are my photos not uploading to iCloud?
If your photos not uploading to iCloud, it could be due to several reasons. Check your iCloud settings and ensure that iCloud Photos is enabled on your iPhone or iPad. Additionally, confirm that you have enough iCloud storage available. If your iCloud storage is full, new photos and videos won’t upload. Other factors include poor internet connectivity or a temporary iCloud issue.
How do I check if I have enough iCloud storage?
iCloud storage, go to your device’s Settings, tap on your name at the top, and select iCloud. Here, you will see a bar indicating your iCloud storage usage. If you find that you are nearing your limit, consider deleting some photos or purchasing additional storage space.
What should I do if my photos are not syncing?
If your photos are not syncing with iCloud, there are a few troubleshooting steps you can take. If it doesn’t help, use CopyTrans Cloudly and upload all photos to your iCloud in a few clicks.
How can I fix photos not uploading to iCloud on my iPhone?
To fix photos not uploading to iCloud on your iPhone, start by ensuring that you have an active internet connection. Verify that iCloud Photos is enabled in your iCloud settings. If everything is set correctly, try restarting your iPhone. Additionally, check for any iOS updates, as these can sometimes resolve syncing issues.
iCloud not syncing photos
Conclusion
To effectively manage your iCloud photo library, you need to make sure that your photos synchronize with iCloud without any problems. Troubleshooting issues such as iCloud sync pauses requires a systematic approach, from verifying network connectivity to properly configuring iCloud settings. By following the recommended troubleshooting steps, users can overcome these obstacles and resume smooth synchronization of their photos.
Also, if you want to upload all your photos to iCloud, it is important to utilize features such as iCloud Photo Library or CopyTrans Cloudly to ensure a complete transfer of your entire photo collection. In addition, considering factors such as available storage space, internet speed, and device settings can have a significant impact on the success of uploading all photos to iCloud.
We hope you got the most out of our troubleshooting tips and alternative solutions to avoid the iCloud photos not syncing issue. If you still haven’t found what you’re looking for, we have an article enlisting all the ways to sync PC photos to iCloud.