At one point or another you may ask yourself how to reset iPhone? There are a few types of reset you can perform.
Why would you want to reset iphone in the first place:
? iPhone glitches (major software issues)
? Upgrading your iPhone to the latest model and giving the old one away
In these cases, your iPhone requires a reset. There’re a few types of reset:
How to reset an iPhone
But before you restart, you need to make sure that you have a backup of your iPhone!
Back up your iPhone first
It is essential to back up your iPhone regularly in case of an unexpected situation that may lead to any kind of reset that we go through in this guide. Luckily, there’re several ways to back up your precious data! You can either use iCloud, iTunes, or an alternative method.
Alternative method: CopyTrans Shelbee
First off, we will guide you through an alternative method known as CopyTrans Shelbee.
Why people choose CopyTrans Shelbee:
✓ Choose any folder to store your backup, as well as change the default backup folder set by iTunes;
✓ Validate integrity of the backup file after each backup*;
✓ Add a password protection at any time to encrypt your backup;
✓ Choose between a full Backup or only latest changes backup;
✓ Set up reminders when it’s time to do a backup.
Get a free test version* Unlike iTunes, CopyTrans Shelbee validates integrity of each backup after it is done. Let’s say you have done 10 consecutive backups over a period of time, attempt #3 was corrupted in the process, but you were never made aware of this, that means that the rest of them were done in vain. Restore attempt will give you an error message. We make sure this does not happen.
CopyTrans Shelbee will allow you to backup Settings, Messages, Camera Roll, and much more. If interested, you can see the full list here.
You can also backup the latest changes only (you need to have at least one full backup for that).
To backup iPhone (and also to backup iPad) with CopyTrans Shelbee:
-
Download and install CopyTrans Shelbee:
-
Refer to the installation guide if you need help installing the program.
-
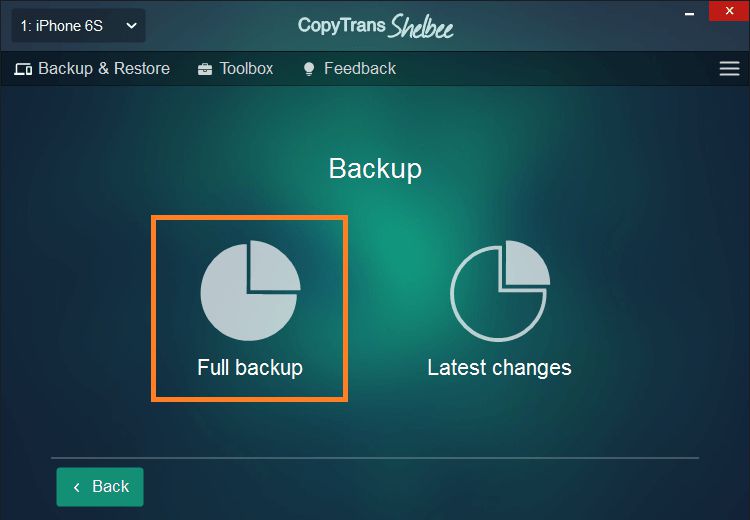
Run CopyTrans Shelbee and connect your iPhone. Choose Backup → Full Backup.
-
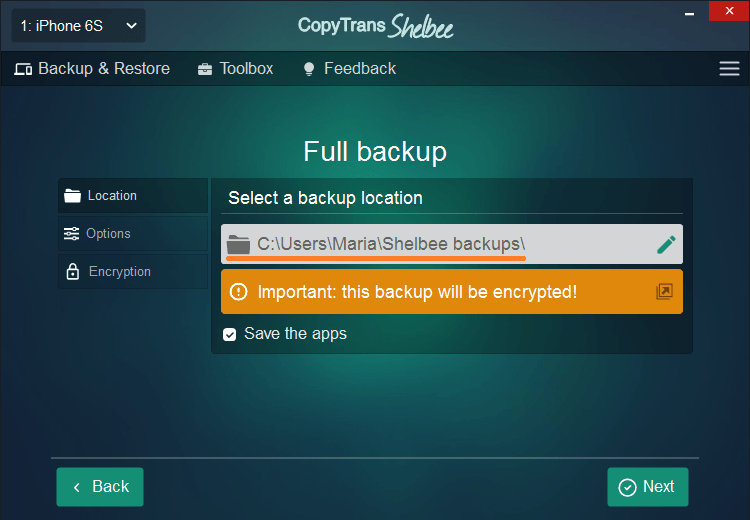
Select the folder where you want to place your backup. By default, iTunes saves your backups to C:\Users\*your user name*\AppData\Roaming\Apple Computer\MobileSync\Backup.
✓ With CopyTrans Shelbee, you can choose any folder!
✓ You can move iTunes default backup folder and transfer all previous backups there.
✓ You can save a backup to external drive. -
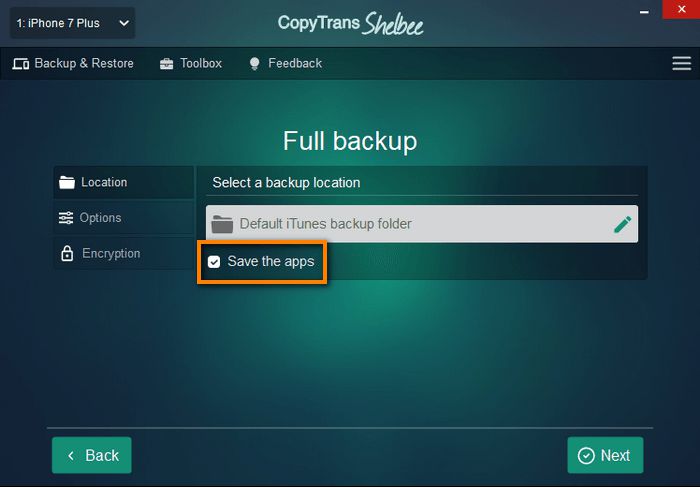
If you want to backup your apps, check Save the apps. You will need to log in to the App store and have a stable internet connection.
✓ Your apps will be backed up from the App store in an .ipa format. CopyTrans Shelbee will also back up app data, but only if the app developer allowed that.
-
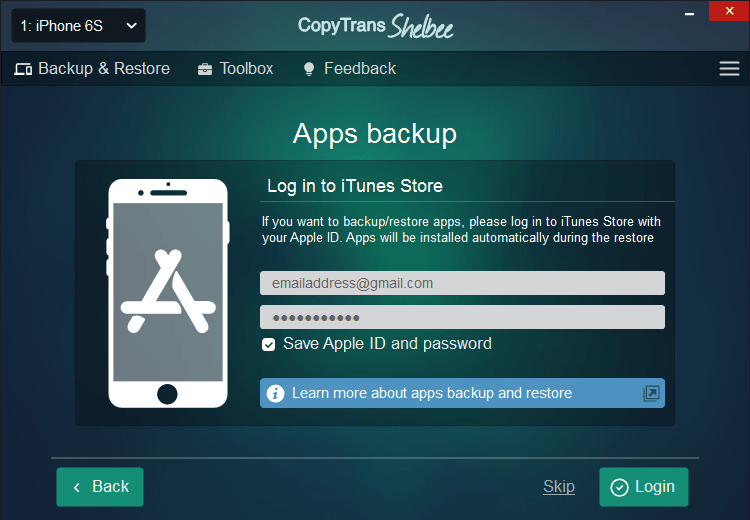
If you chose to back up the apps, log in to the App Store.
-
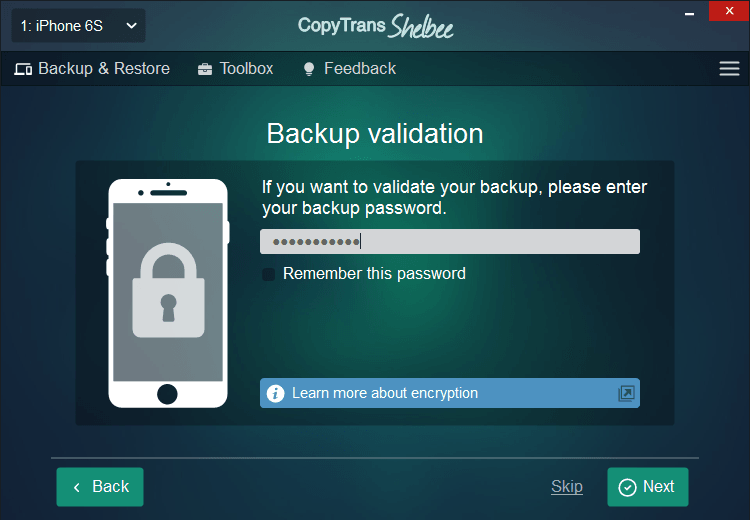
If you see this screen, it means you have an iOS backup password. The program will use it to validate the integrity of the backup, making sure you can restore later. iTunes would backup at once, but not restore until you’ve inserted the right password. What password again?
• Encrypted backups include passwords, Wi-Fi settings, etc. More about encrypted backups from Apple.
• If you don’t remember your iOS backup password, you can reset it.
-
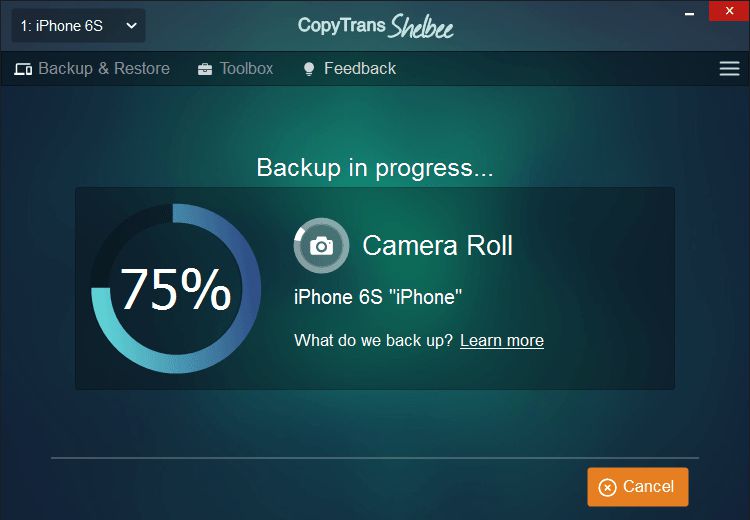
Wait while CopyTrans Shelbee performs the backup. Do not disconnect the device and be patient. Backing up is a complex procedure and may take some time, especially if you chose to backup your apps: the process happens over the internet and requires extra time.
-
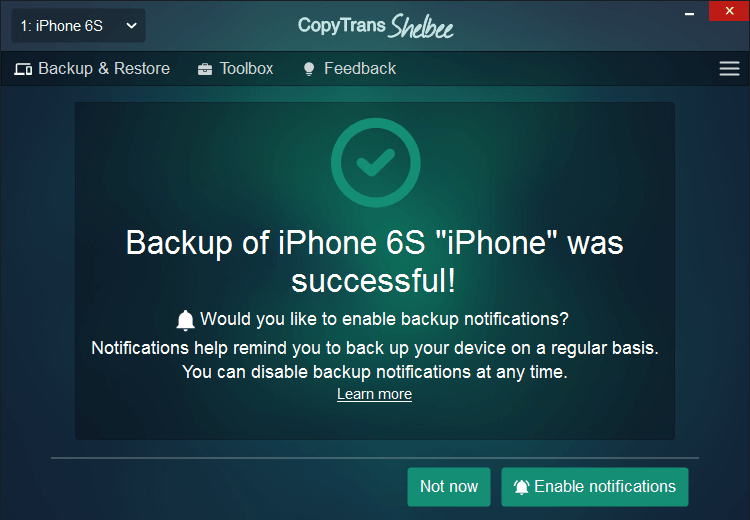
This is it! Your backup is now successfully stored on your PC.
Now that your backup is ready, you can do full or custom restore anytime using CopyTrans Shelbee. You can even extract the data to your PC using CopyTrans Backup Extractor. Also, next time you can make an incremental backup, saving only the latest changes and space on your hard drive.
YouTube guide
iCloud backup
Apple’s native iCloud solution is a well-known way to back up and store your iPhone data among the iPhone users worldwide. No wonder it is so popular – you can easily access it without using a PC. Though, there’re several downsides to it.
Why we don’t recommend using iCloud:
✘ Your personal data is being stored on Apple servers;
✘ Free iCloud storage is only 5GB;
✘ You’ll pay loads of money for a subscription in the long run;
✘ Should you decide to stop paying for iCloud, all your iCloud data will vanish into the abyss.
If iCloud backup is the solution for you, here are the steps:
-
To backup iPad to iCloud, make sure you have an active internet connection.
-
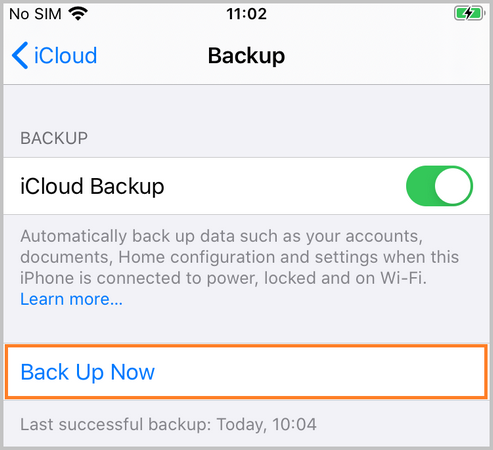
On your iPhone, go to Settings → your Apple ID (sign in if not already signed in) → iCloud → iCloud Backup.
-
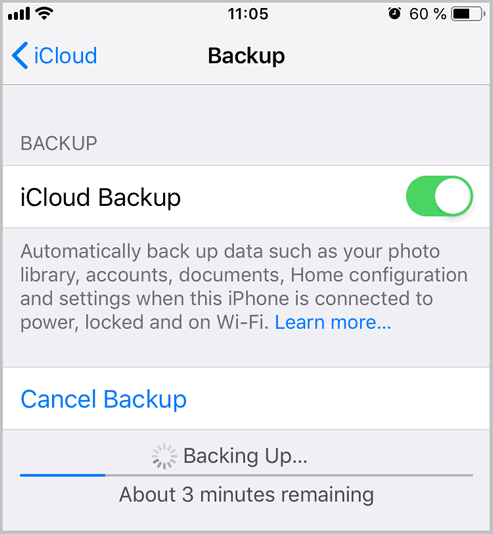
You will see a backup summary screen with the date and time of your last backup. Press Back Up Now to backup iPhone to iCloud.
-
Wait until iCloud completes the backup; be sure not to disconnect your iPhone from the internet.
-
Your iCloud backup is ready! That is how to backup iPhone with iCloud.
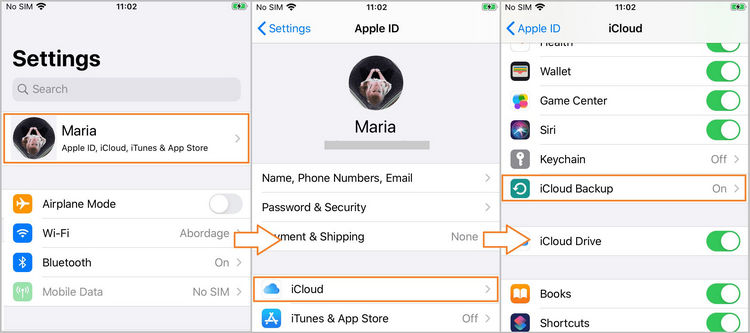
💡 If you want to schedule regular backups to iCloud, make sure you enable iCloud Backup in Settings → your Apple ID → iCloud → iCloud Backup. Once the switch next to iCloud Backup is on, your iPhone will be backed up automatically every day. You will, of course, need to make space for regular backups in your iCloud, which would probably mean upgrading your iCloud storage plan, especially if you have a big storage capacity on your iPhone.
! Important
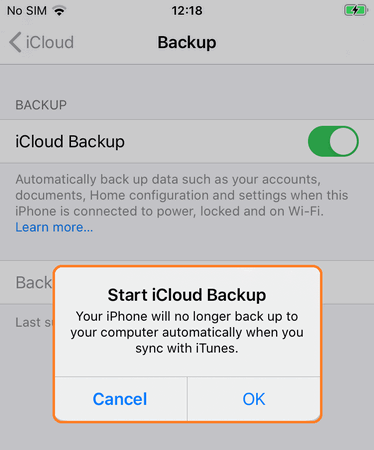
If you switch on automatic iCloud backups, your phone will stop making automatic backups every time upon connecting to iTunes. Jump to the right section to run a manual backup with iTunes.
Back up with iTunes
We get countless support letters from frustrated users that absolutely hate iTunes. The upside of iTunes is that it is the only offline solution that Apple has for us. But there are plenty downsides to it so iPhone users naturally try to stay away from it as far as possible.
Why iTunes isn’t the best solution:
✘ No backup validation, hence, you do not know if your backup is corrupted;
✘ It is a challenge to locate the iTunes backup on your PC;
✘ iTunes backup is a space-consuming little thing;
✘ You cannot selectively restore data from a backup overwriting all new information on your iPhone.
Here are the steps on how to backup iPhone to iTunes:
-
Launch iTunes and connect your device to the PC.
-
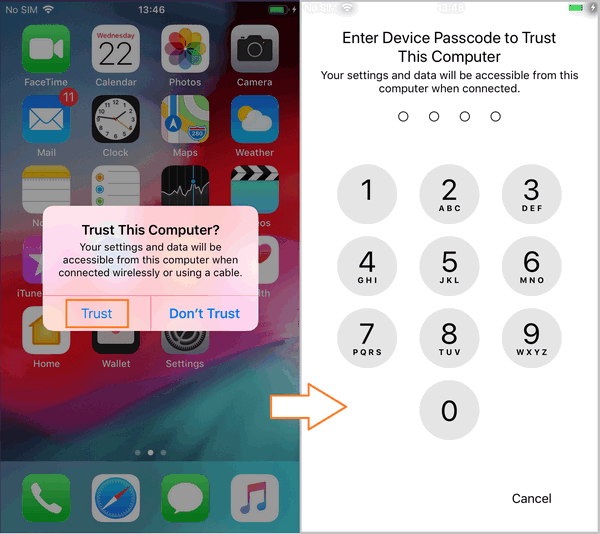
Choose Trust Computer on your iPhone and enter your password to confirm.
-
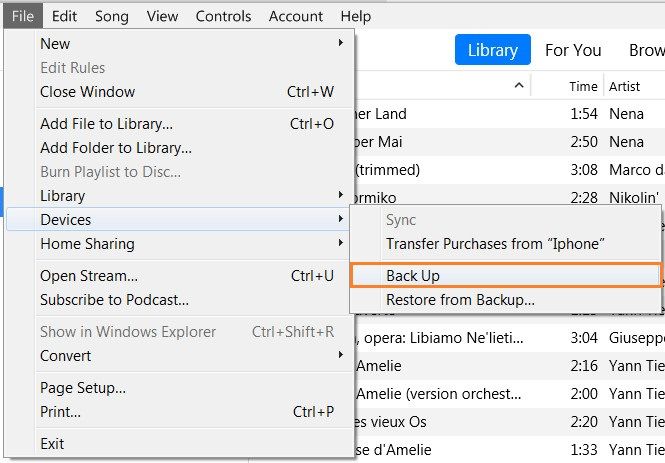
In iTunes window, go to File → Devices, then click on Back Up to initiate the process.
-
The top iTunes bar will then change and become an indicator of the backup progress.

Important fact
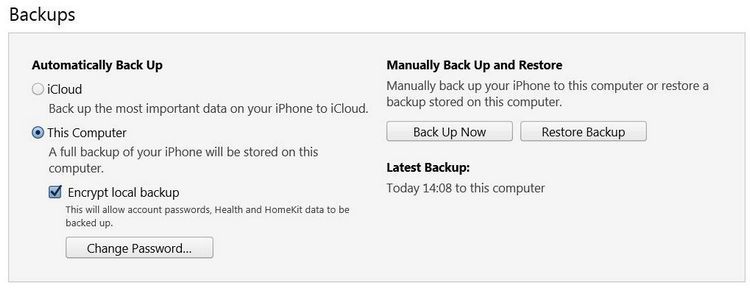
If you want your iTunes backup to include your saved passwords, Wi-Fi settings, website history and health data, you will need to encrypt your backup – if it doesn’t have a password already. To check whether your device is encrypted and manage your password settings:
- Click on the iPhone icon at the top iTunes panel.
- You will see info about your device and its backups, indicating the time of the last backup and password management options. You can then see whether your backup is password-protected (there will be a check next to “Encrypt local backup”) and run a backup or restore.
![]()
How to reset an iPhone
The type of reset that your iPhone needs depends on the issue you’re facing. If it’s a little glitch, you don’t have to be afraid of losing your data. However, if your iPhone is completely unresponsive, let’s hope you have your iPhone backed up.
Soft reset iPhone
You need to soft reset iPhone when there’s a minor system glitch like cellular data issues. To perform a soft rest, you need to:
-
Turn your iPhone off.
-
Turn it back on.
Don’t worry, soft reset iPhone doesn’t involve any data loss from your device!
Force restart iPhone
If your iPhone is completely unresponsive, you’ll need to force restart iPhone:
Hold the Volume Down and Power buttons.
This way shouldn’t lead to any data loss either but you still need to have backup as you never know if anything goes wrong.
iPhone recovery mode
iPhone recovery mode is required when your iPhone is completely unresponsive and doesn’t get past the Apple logo. Although, this method will help your phone function in the expected manner, you risk losing everything on your iPhone.
The instructions for the recovery mode differ depending on your iPhone model.
iPhone 8 and later:
-
Connect your iPhone to iTunes.
-
Press and release the Volume Up button.
-
Press and release the Volume Down button.
-
Press and hold the Power button until the Recovery Mode screen pops up.
-
Choose Update or Restore option on iTunes.
iPhone 7 and 7 Plus:
-
Connect your iPhone to iTunes.
-
Press and hold the Power and Home button until the recovery mode screen pops up.
-
Choose to Update or Restore option in iTunes.
iPhone 6s and earlier:
-
Connect iPhone to iTunes.
-
Press the Power and Home button until the Recovery Mode screen pops up.
-
Choose Update or Restore in iTunes.
How to factory reset iPhone
-
Go to Settings on your iPhone and navigate to General.
-
Scroll down to the Reset option.
-
Select Erase All Content and Settings to factory reset your iPhone.
-
Enter the device password and tap Erase to confirm the factory reset of your iPhone.
-
Your device will restart and will be clean as new.
iPhone reset may cure your iPhone when it’s feeling under the weather. However, some medicine has its side effects. The worst one for you would be losing all your personal data. So make sure you always have a backup at hand to reverse the loss. CopyTrans Shelbee is just the answer to preserve your precious iPhone contents.