
 (9 votes, average: 4.89 out of 5)
If you have been accumulating your music for years, creating your perfect playlists, and after one of the iTunes updates, you realize that all of your hard work and dedication are wasted. Manual Backup is a CopyTrans feature that helps you to back up songs from iPhone to PC (or iTunes), allowing you to customize the export parameters. If you want a fully automated transfer to iTunes, it is better to choose Smart Backup.
With Manual Backup, you decide what tracks to transfer and where to transfer your music files. You can choose to back up your music library to a folder on your PC or transfer selected iPhone tracks to iTunes. Whichever way you choose, see how to do it below:
- Backup songs – From iPhone to PC
- Download music to iTunes – From iPhone library
- Customize music – Display order on the PC
- Personalize music – In iTunes
Backup songs
From iPhone to PC
-
✔ transfer selected tracks and playlists to your PC;
✔ back up your playlists;
✔ update your previous backup;
✔ save your music to an external hard drive;
✔ manually update selected tracks.
If you want to transfer your entire music library to a folder on your PC, this is the best way to go. Here is how to proceed:
- If you don’t have CopyTrans already, download and install the application:
Try CopyTrans for free! -
Launch CopyTrans and connect your device.
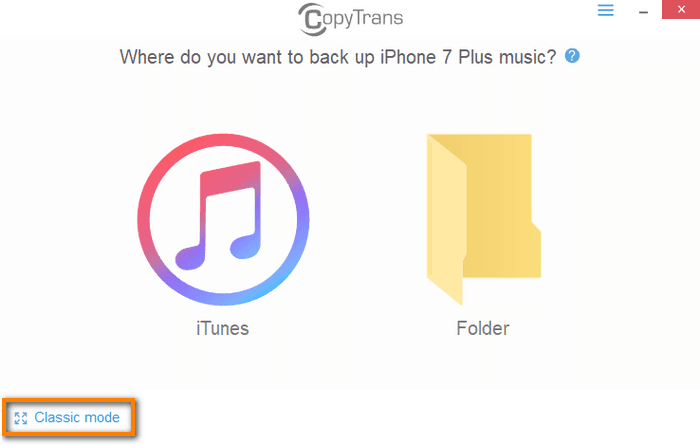
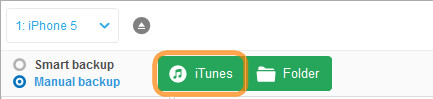
- Switch to the Classic mode in the bottom-left corner.
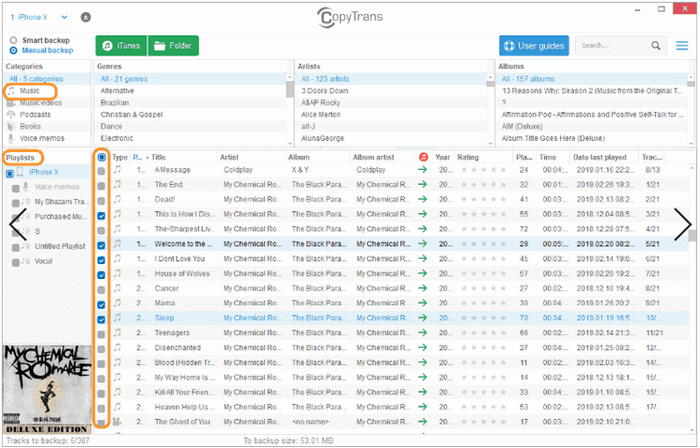
- In the Classic mode, select the tracks you wish to transfer. If you want to transfer your entire library to the PC, you do not need to choose any files.
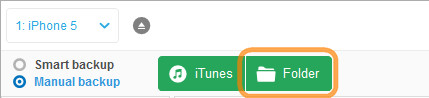
- Once the tracks have been selected, click on the green Folder button at the top.
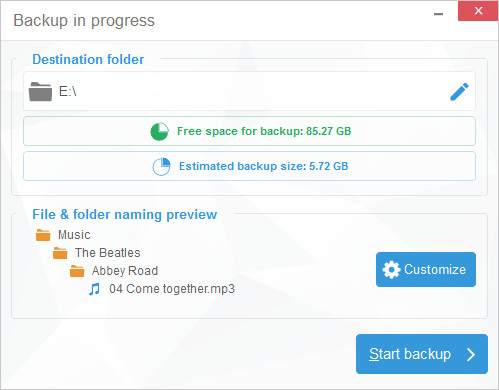
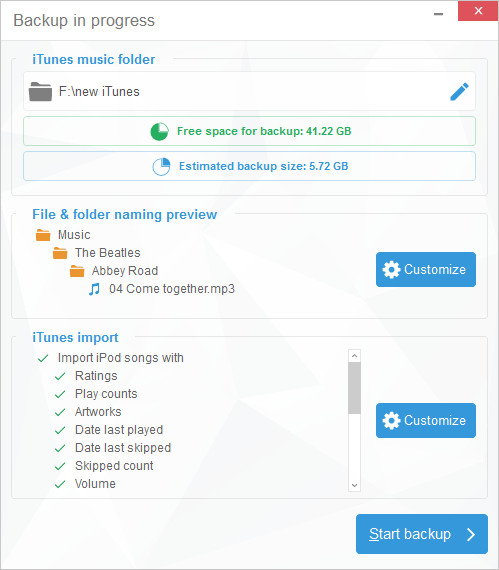
- Next, choose the folder where you want to transfer your music. You may also choose to customize other export details, such as folder structure or how the files will be named. To do so, just click on Customize. When in doubt, see our customization options overview.
File formats supported by CopyTrans
📁 Music and other audio: .mp3, .m4r, .m4a .aac
📁 Video: .mov, .mp4
- Click on Start backup and wait for the process to be completed.
- Congratulations! Your iPhone music now safely resides on your PC, together with all your playlists and track info. Here is the entire list of all information that CopyTrans can back up.
If your iDevice is not recognized, please follow these troubleshooting tips.

Download music to iTunes
From iPhone library
For a seamless and fast transfer of your iPhone music to iTunes, we recommend using the Smart Backup option in CopyTrans. But if you need a little more control over the copied files, Manual Backup is just for you. Here is how to use it:
- If you don’t have CopyTrans already, download and install the application:
Get a free CopyTrans trial version! - Launch CopyTrans and connect your device. If your iDevice is not recognized, please follow these troubleshooting tips.
- Switch to the Classic mode in the bottom-left corner.
-
CopyTrans will then load your music library. Next to each track, you will see its status:
-
• This track is not in iTunes. The song should be transferred.

• This track is in iTunes but is not up-to-date. The song should be updated.

• This track is in iTunes and up-to-date. It will not be transferred.

When the loading process is complete, you can select the tracks for transfer (you can also select all the songs).
- Once the tracks to transfer have been selected, click the Backup to iTunes button in the top-right corner.
- Check that the export folder is correct and customize the export if you want to. When in doubt, see our customization options overview.
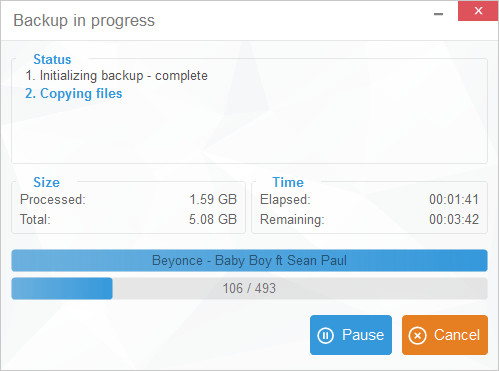
- Click on Start Backup. The backup to iTunes will then begin. The progress bar in a transfer window will indicate how many songs are already transferred.
- Once the backup is finished, you will see a detailed summary of the transfer process. All chosen tracks, track information, artworks, and playlists are now in iTunes in the exact way you wanted them to be displayed.
NOTE: here is the complete list of all information that CopyTrans backed up.
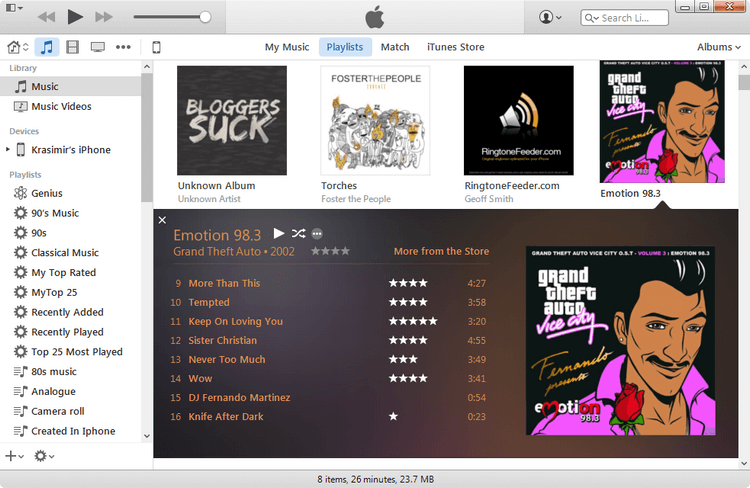
Enjoy your newly transferred iTunes library! If you want to customize your music in iTunes, please read further.
Customize music
Display order on the PC
Whether you use Manual backup to transfer your tracks to iTunes or PC, CopyTrans allows you to tweak the settings a bit and get the result you want. See what you can do below:
If you export to a folder on your PC, you will see a standard customization window:
In this window,
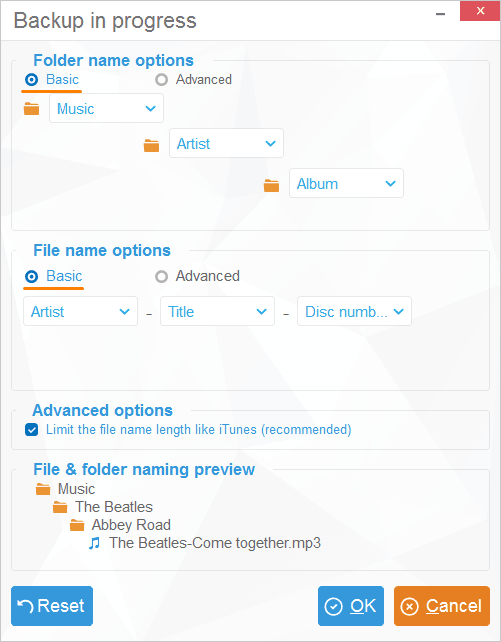
- Folder name options allow you to set the number and structure of subfolders for the music files you export. If you want all the tracks to appear in one folder, simply set the first folder to Music and leave the other fields blank. To categorize your music by albums, select Music first, choose Albums for the next field and leave the last field blank.
- Import iPhone playlist allows you to name all the exported files in the same way. If you want the file names to start with the artist and then show the track name, choose Artist for the first field and Title for the second one.
- Limit the file name length like iTunes sets a maximum of 96 characters for any file name.
- File & folder naming preview allows you to see how the exported files and folders will be organized on your PC under the current settings.
If you feel that the dropdown options are not for you, you can choose advanced customization options. The window will then look like this:

By playing with the tags CopyTrans provides and putting them in the correct order with the dividers you need, you can construct pretty much any export layout!
After you set the parameters to your liking, you can press OK and continue with the export.
Personalize music
In iTunes
If you export to iTunes, your customization window will look like this:
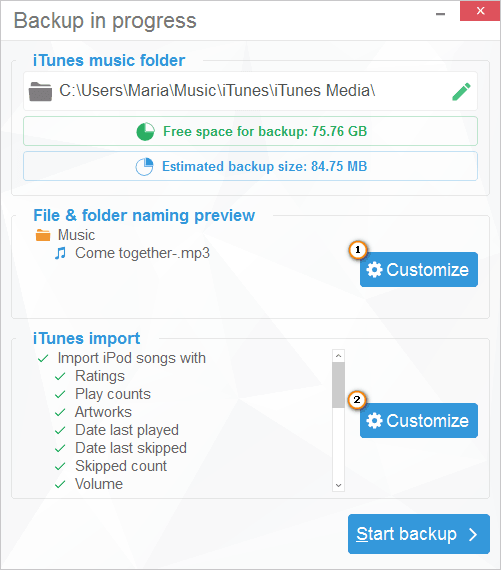
Under the iTunes music folder, you can specify where to export your library. CopyTrans finds the folder automatically, so only change it if you are sure you’re doing the right thing.
File & folder naming preview will take you to standard customization options (see above).
The iTunes import customization button will spawn the following window:
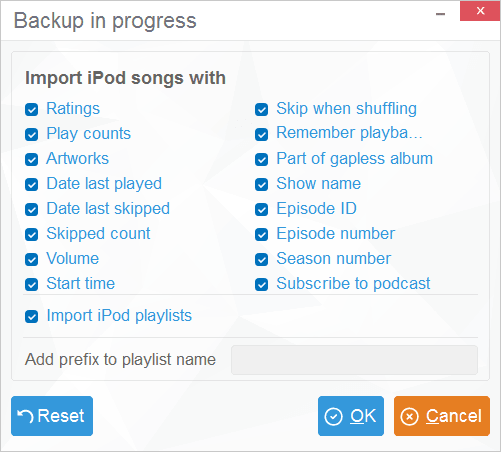
In this window, you can
- Select the type of track info that should be exported to iTunes;
- Choose whether to import your playlists;
- Add a prefix to all your playlists (e.g., 11-10-2009 Rock or David Rock) to mark the playlists from this specific export.
After you have set the parameters to your liking, you can press OK and proceed with the export.
Conclusion
Now you know how to transfer your music from iPhone, iPad, or iPod to your PC. If you still have questions, maybe we can answer them with our list of CopyTrans user guides.