
 (218 votes, average: 4.00 out of 5)
iTunes is an essential tool for anyone who owns an Apple device, as it serves as the primary platform for managing your iPhone. Do you know that iTunes backups are done automatically every time you connect your iPhone to iTunes (if you don’t have the iCloud Backup option enabled)? iTunes keeps the iOS backup folder directly on the system drive. That means that backups of your device, which contain critical data such as contacts, messages, photos and apps, take up valuable storage space on your computer’s hard drive.
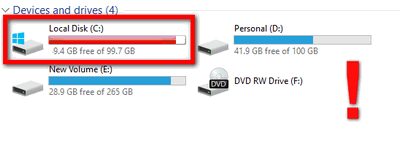
Such local backups can take up several gigabytes of space on your computer. Therefore, it is better to change iTunes backup location to a hard drive, for example.
But how could you update iPhone backup location made with iTunes? This question is really logical, as iTunes does not allow to change the backup folder location. In this article, we will explore the step-by-step process of changing iTunes backup location so that you can save vital storage space and optimize the performance of your Apple device.
- What does iTunes backup include?
- iTunes backup location
- Why change iTunes backup location
- Change iTunes backup location automatically recommended
- Where is iPhone backup stored on PC? – FAQ
- Manually move the iTunes backup folder (advanced users)
What does iTunes backup include?
Save your data on your PC is always a good idea, as you can restore your iPhone from a backup that is made with iTunes or other programs. But what does iTunes save in the backup? Let’s find it out!
- Device Settings:
All device settings, including Wi-Fi passwords, background images, home screen layouts, ringtone preferences, and other miscellaneous options, are included in an iTunes backup. - Photos and Videos:
iTunes backs up all photos and videos saved on your device, including images and videos captured using your device’s camera, screenshots, and saved images received through messages or emails. - Contacts, Calendars, and Reminders:
Important information such as contacts, calendar events, and reminders are backed up by iTunes. This data can become a lifesaver if your device is lost or damaged. - Messages:
Text messages, iMessages, multimedia messages, and attachments are also included in an iTunes backup, ensuring that your conversations and personal data are safe. - App Data:
An iTunes backup includes data from all apps installed on your device. This includes any app-specific settings, preferences, and documents. - Health Data:
Health data, including step counts, activity information, and medical records, are now also included in iTunes backups starting from iOS 11.3 or later.
iTunes backup location
iTunes saves backups to a Backup folder and backs up only certain iOS data such as app files, settings and camera roll photos from iPhone, iPad, or iPod Touch each time you sync. The location of the Backup folder depends on the operating system. So, where does iTunes store backups?
To locate iTunes backup folder on Windows 10, 8, 7:
- Find the Search bar:
- In the Search bar, enter %appdata% or %USERPROFILE% (if you downloaded iTunes from the Microsoft Store).
- Press Return.
- Double-click on these folders: “Apple” or “Apple Computer” > MobileSync > Backup.
-
In Windows 10: click on the Search bar next to the Start button.
In Windows 8: click on the magnifying glass in the upper-right corner.
In Windows 7: click on Start.
Alternatively, go to: \Users\*Username*\AppData\Roaming\Apple Computer\MobileSync\Backup\.
To locate iTunes backup folder on Mac:
- Click on the magnifier icon in the menu bar.
- Type or copy and paste this: ˜/Library/Application Support/MobileSync/Backup/
- Press Return.
iTunes backup location Windows 10
Why change iTunes backup location
By default, iTunes saves backups to your computer’s primary hard drive, which can quickly eat up valuable storage space. For those who are short on disk space or looking for better organization, changing the location of iTunes backups can be a game changer. So, why transfer your iTunes backups? Here are some reasons why:
-
Free up storage space
The main reason for changing the iTunes backup location is to free up storage space on your computer’s hard drive. As Apple devices become more advanced, the amount of data they store continues to increase. This means that backups can quickly consume several gigabytes, if not more, of disk space. By relocating the backup to an external hard drive, you can regain valuable storage capacity on your primary drive.
-
Avoid disk overload
As backups accumulate over time, they can overload your computer’s hard drive, causing decreased performance and system slowdowns. By changing the location of your iTunes backups, you’ll ensure that your computer runs smoothly and isn’t overloaded by an excess of backup files. This proactive approach helps prevent disk overload and improves overall system performance.
-
Organization and management
Changing the iTunes backup location provides an excellent opportunity to better organize and manage your device backups. For users with multiple Apple devices, it can be a challenge to keep track of backups for each of them. By relocating backups to separate folders or external drives labeled with device names, you can easily identify and access the specific backup you need.
-
Additional data security
Although iTunes backups are usually safe on your computer’s primary hard drive, accidents such as disk failures, system crashes or malware attacks can lead to data loss. By keeping your backups in a separate location or on an external drive, you’ll add an extra layer of security to your data. This way, even if something happens to your primary disk, you can rest easy knowing that you have a secure backup stored elsewhere.
-
Flexibility and portability
By changing the iTunes backup location, you gain flexibility and portability when it comes to managing your backups. You can easily move the iTunes backup folder to another computer or transfer it to a new device. This is especially handy if you are switching computers or if you want to share backups with another user.
If you also ask yourself: “How to access iCloud backup?” We have an answer for you! Just have a look at the guide Find iPhone backups on PC or in iCloud automatically.
With CopyTrans Backup Extractor you can view iCloud backups and view iCloud backup files.
How to change iTunes backup location
Automatically
As stated earlier, iTunes does not allow to change the backup folder location.
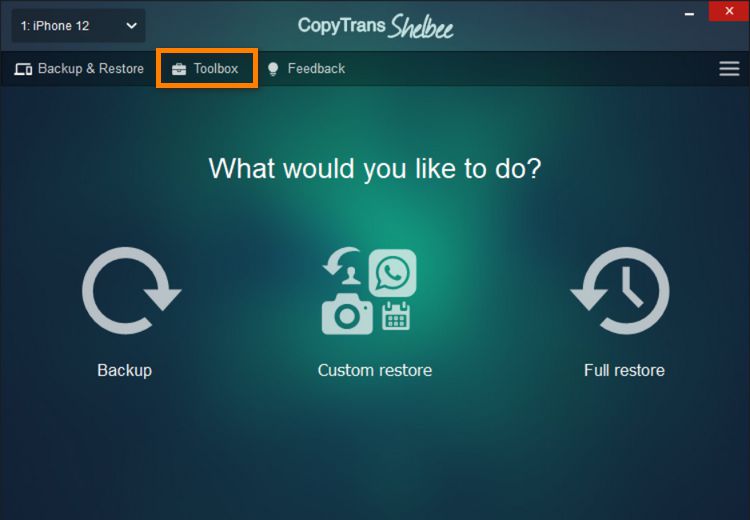
To automatically change the location of your iTunes backup folder and move its contents wherever you like – use CopyTrans Shelbee which is easy to navigate and can handle various backup and restore tasks.

Unlike iTunes, CopyTrans Shelbee will:
✔️ Save to any folder to store your backup;
✔️ Add password protection to encrypt your backup;
✔️ Choose between a full backup or only the latest changes backup;
✔️ Compatible with iTunes backup;
Here is what you need to do:
-
Download and install CopyTrans Shelbee:
-
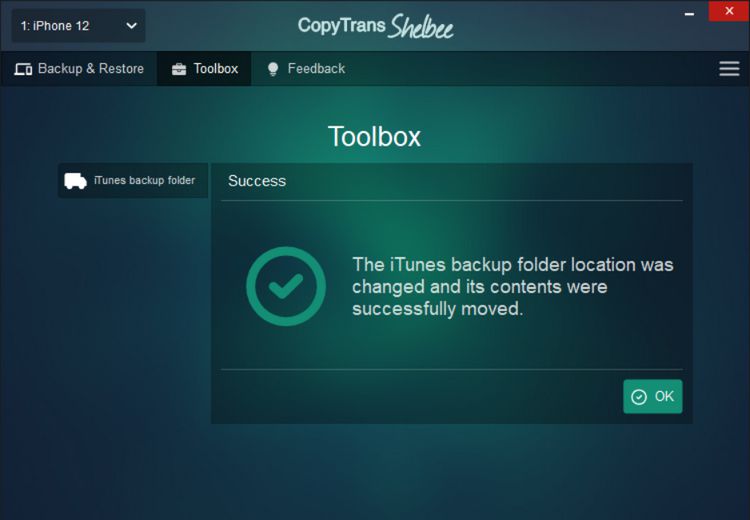
Close iTunes and start CopyTrans Shelbee. Click Toolbox.
-
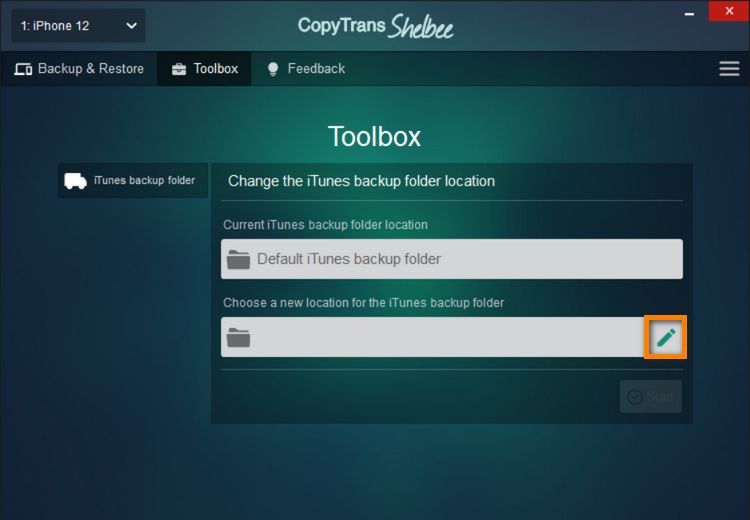
Click on the Pencil symbol to choose a new location for your iTunes backup folder.
-
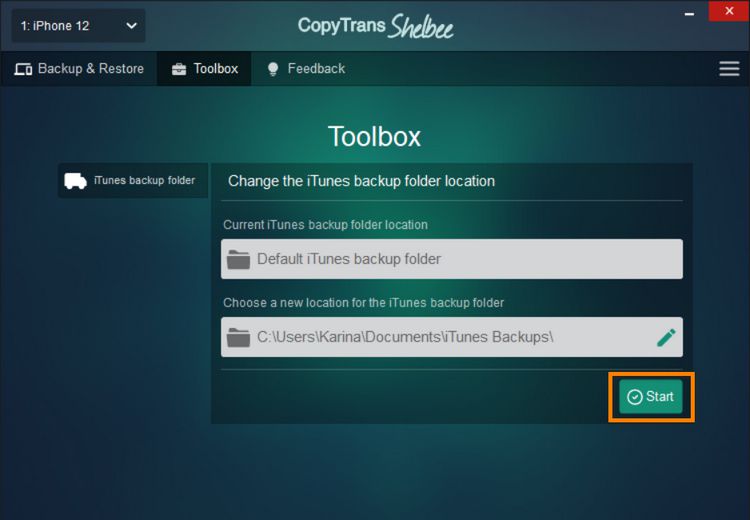
Select the folder and click OK. Tap Start.
-
Stand by until CopyTrans Shelbee changes the iTunes backup folder and that’s all! The iTunes location was changed, and its contents were successfully moved.
Check out our comparison table that lists the features of CopyTrans Shelbee, iTunes and iCloud. Makes it pretty straightforward, doesn’t it?
| CopyTrans Shelbee | iTunes | iCloud | |
| Full backup | Yes | Yes | Yes |
| Select backup type: full vs latest changes |
Yes | No | No |
| Encrypted backup | Yes | Yes | No |
| Check backup integrity | Yes | No | No |
| Check for password issues | Yes | No | No |
| Choose backup folder | Yes | No | No |
| Move default backup location | Yes | No | No |
| Backup to external drive | Yes | No | No |
| Backup apps in .ipa format | Yes | No | No |
| Backup Password, Wi-Fi settings, browsing history |
Yes *only with encrypted backup |
Yes *only with encrypted backup |
Yes |
| Full restore | Yes | Yes | Yes |
| Restore selected data | Yes (only contacts or messages, etc) |
No | No |
| Restore of backup saved on PC | Yes | Yes | No |
| WhatsApp Restore | Yes | Yes *restore ALL data, not only WhatsApp |
Yes *restore ALL data, not only WhatsApp |
| Apps restore (no longer exists in App Store) |
Yes *apps must be backed up before deletion |
No | No |
| Restore Password, Wi-Fi settings, browsing history |
Yes *only with encrypted backup |
Yes *only with encrypted backup |
No |
| Restore from iCloud backup | No | No | Yes |
Change iTunes backup location
YouTube tutorial
Changing iTunes iPhone backup location never was that easy with iTunes itself, always a difficult task, but CopyTrans Shelbee changed the game. Now you can change iTunes backup location in a few clicks!
If you’re interested, learn more about CopyTrans Shelbee.
Where is iPhone backup stored on PC?
FAQ
What is an iPhone backup and where is it stored on a PC?
When you backup your iPhone using iTunes, the backup file is saved on your PC. The specific location of the backup folder varies depending on your operating system.
How can I find iTunes backup location in Windows?
To locate your iPhone backup stored on your computer, you can navigate to: C:\Users\YourUsername\AppData\Roaming\Apple Computer\MobileSync\Backup.
Can I change the default iTunes backup location on Windows?
Yes, when you know where the iTunes and backup data stored, you can change the iTunes backup location on Windows by using CopyTrans Shelbee.
How do I find the iTunes backup location on Mac?
The location of the iTunes backup file on Mac is typically in: ~/Library/Application Support/MobileSync/Backup/.
Is it possible to view the iOS device backup file’s content on a Windows PC?
You can view iPhone backup files by using CopyTrans Shelbee that allows you to extract and explore the contents of the backup, as it easy to know where the iTunes backup stored with our program.
Can I delete an iPhone backup stored on my PC?
Yes, you can delete an iPhone backup by going to the iTunes preferences and managing your backups from there.
How do I back up my iPhone using iTunes on a Windows PC?
To backup your iPhone on a Windows PC, you need to connect your iPhone to the PC, open iTunes, and click on the device icon. From there, you can choose to back up your device. Or you can use a better alternative – CopyTrans Shelbee and enjoy the process.
Can I extract content from my iPhone backup files on a PC?
Yes, it is possible to extract content from your backup by using CopyTrans Backup Extractor that allows you to access and recover content from your backup files.
Can I relocate backup file on my PC ?
Yes, it is possible to choose backup you want and change its location and then back up your iPhone in a new destination.
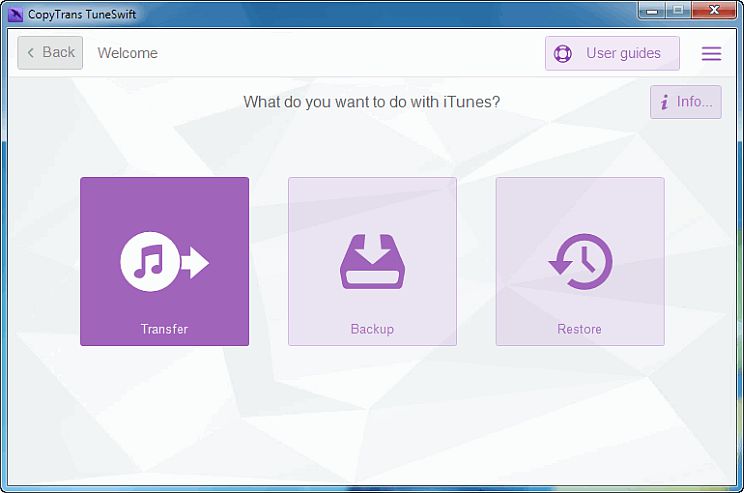
Changing the iTunes backup location is a good start but if you really want to get the job done why not claim back additional PC space from iTunes? CopyTrans TuneSwift allows you to move the entire iTunes library contents including songs, playlists, podcasts, books, apps etc. to another drive in a few of clicks. The iTunes backup location is not affected by this move. Download CopyTrans TuneSwift
-
Ensure iTunes is closed and run CopyTrans TuneSwift. Choose Transfer:
-
Select PC (Windows), then tap on External hard drive or New folder/drive on this computer:
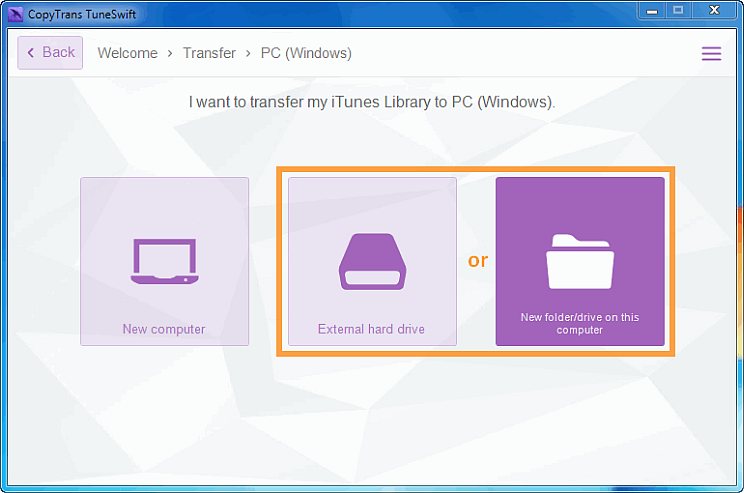
Once the transfer completes, your iTunes library is moved to the location of your choice, and you have plenty of newly freed-up space on your PC hard drive. Neat!
iPhone backup location
Move the backup folder manually on Windows 10
The steps below are intended for advanced Windows users who would like to change the default iTunes backup location.
-
We recommend using the automatic method as the manual method below involves the use of advanced Windows utilities including Command Prompt.
-
Please note that the instructions do not work for Windows XP.
-
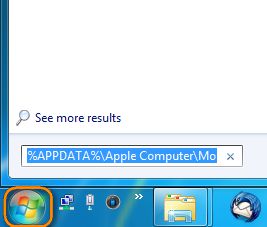
Locate your current iTunes backup folder. If you are using Windows 10, 8 or 7, use the Windows Start Menu to locate the iTunes backup folder and enter the following in the Search box:
for classic iTunes: %APPDATA%\Apple Computer\MobileSync
for Microsoft Store iTunes: %USERPROFILE%\Apple\MobileSync\Backup
-
Move the current iTunes iOS backup folder to the new desired destination via simple drag-and-drop:
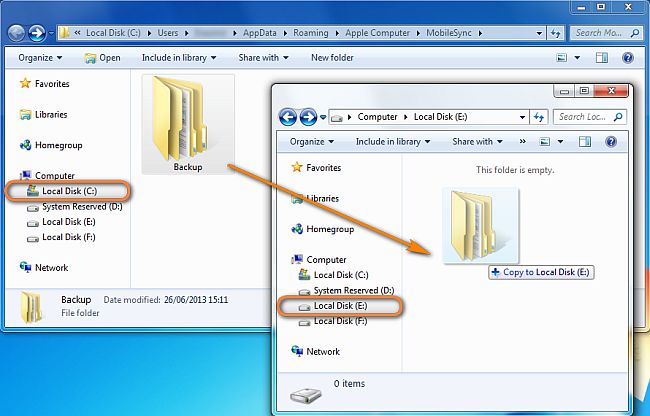
NOTE: Make sure that you have the “Backup” folder fully copied to the new destination drive. Once you do so, you can either delete the “Backup” folder from the original location or rename it to “Backup_OLD”. At the end of this guide, you can delete the “Backup_OLD” folder. -
At the original folder location, press the SHIFT key, right-click and select Open command window here:
Important: For Windows 10 users choose Open Powershell window here.
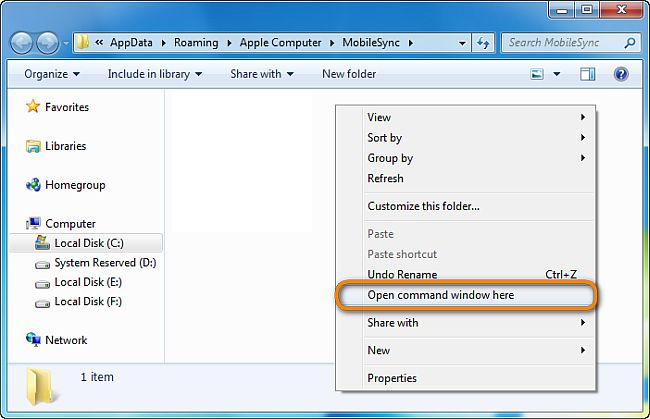
This will open a command window adjusted for that folder: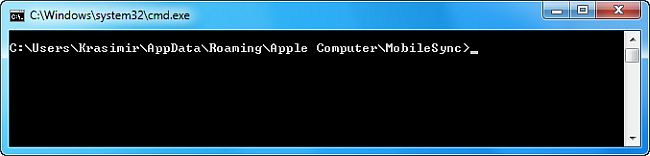
-
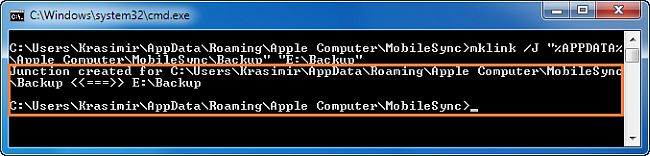
In the command prompt window, manually type in the following command where E:\ is the new drive location (drive letter may vary) and “Backup” is the name of the iOS backup directory you just moved:
for classic iTunes: mklink /J “%APPDATA%\Apple Computer\MobileSync\Backup” “E:\Backup”
for Microsoft Store iTunes: mklink /J “%USERPROFILE%\Apple\MobileSync\Backup” “E:\Backup”
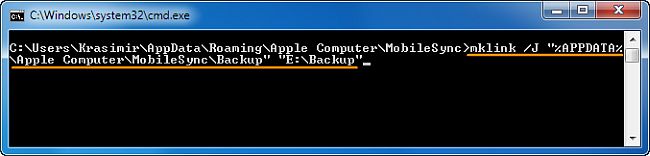
Info: “mklink” is the Windows shell command for adding a symbolic link. The “/J” switch refers to a specific kind of symbolic link called directory junction.
-
You will now see the command prompt window return a success in creating a junction.
-
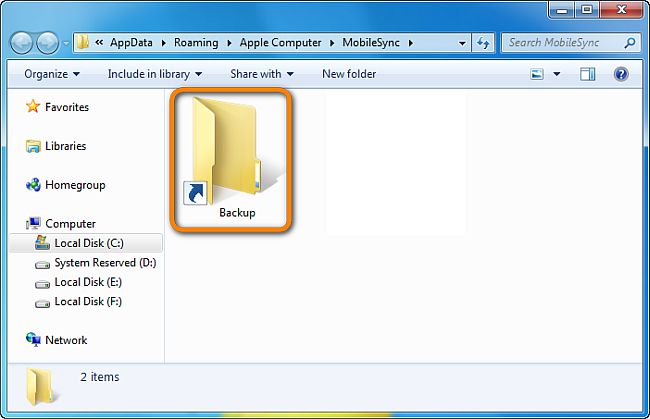
A new folder shortcut called “Backup” will appear in the original location:
-
Double click on the “Backup” folder shortcut and while it may seem you are still within the MobileSync folder on the C: drive, what you actually see are the contents of the “Backup” folder you previously moved to the new location. You can think of it as a virtual tunnel created through your computer directory space:
-
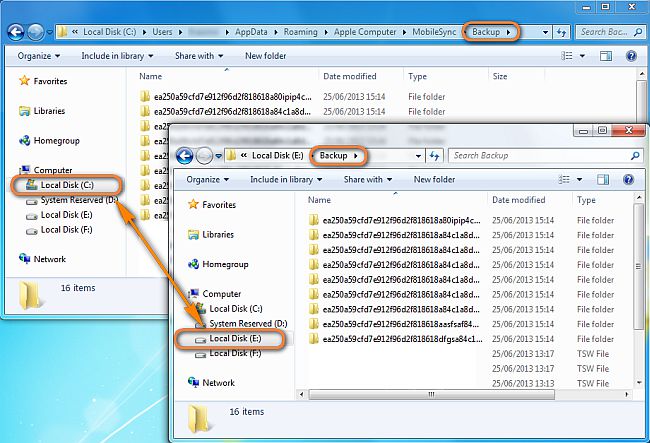
That’s it. We answered the question: where are iTunes backups stored. You have now learned how to move iOS backup folder from the primary partition to another drive and, in the process, freed up valuable system space:
NOTE: If CMD is not showing up with the shift click, go to the MobileSync folder, then type CMD and press Enter in the directory (User>Name>Appdata>Roaming>etc). The CMD prompt should pop up and you can continue through step 6.
iTunes iPhone backup location
Common errors and solutions
While moving your iTunes backup folder, you might encounter some issues. Here are the most common problems and how to fix them:
-
Symbolic Link Not Working
Issue: After creating the symbolic link, iTunes still saves backups to the original location.
Solution:
- Ensure you’ve used the correct command syntax. For Windows, the command should be:
mklink /J “C:\Users\YourUsername\AppData\Roaming\Apple Computer\MobileSync\Backup” “D:\iTunesBackup” - Run Command Prompt as Administrator before executing the command.
- If the link was created incorrectly, delete it and recreate it using:
rmdir “C:\Users\YourUsername\AppData\Roaming\Apple Computer\MobileSync\Backup”
- Ensure you’ve used the correct command syntax. For Windows, the command should be:
-
A file cannot be created if it already exists
Issue: You receive the error “mklink cannot create a file if it already exists”.
Solution:
- Move (do not copy) the original **Backup** folder before creating the symbolic link.
- If you have already copied it, delete the original Backup folder so that the MobileSync directory is empty.
- Run the command again.
-
The system cannot find the specified path
Issue: One of the two paths in the command does not exist.
Solution:
- Double-check that both paths are correct.
- Ensure there are no typos in the command.
- Confirm that the destination folder exists before creating the symbolic link.
-
iTunes could not back up the iPhone because the backup was corrupted or incompatible with the iPhone
Issue: iTunes detects the new backup path but cannot write files there
Solution:
- Check the permissions of the new backup folder and ensure your user account has full access.
- Try creating a different backup folder on another drive and updating the symbolic link.
-
“Syntax error”
Issue: The command format is incorrect.
Solution:
- Ensure the command is typed **manually** instead of copying and pasting.
- Enclose both paths in **quotation marks** (`”`).
-
“Access denied”
Issue: You do not have sufficient permissions to execute the command.
Solution:
- Run CMD as Administrator and try again.
-
“Local volumes are required to complete this process”
Issue: The symbolic link is being created on a network drive (NAS, server, or SMB share)
Solution:
- Instead of using `/J`, use `/D` in the command: mklink /D “C:\Users\YourUsername\AppData\Roaming\Apple Computer\MobileSync\Backup” “X:\Backup”
- Administrator rights may still be required.
-
“Your authorizations are not sufficient to perform this operation”
Issue: Your user account lacks the necessary permissions.
Solution:
- Run CMD as Administrator and retry the command.
-
“mklink : The name ‘mklink’ was not recognized as the name of a cmdlet, function, script file, or executable program”
Issue: You are using Windows PowerShell instead of Command Prompt (CMD)
Solution:
- Open CMD (Press `Win + R`, type `cmd`, and press Enter).
- Execute the `mklink` command in **CMD**, as PowerShell does not support it by default.
By addressing these common issues, you can ensure a smooth transition to a new iTunes backup location without losing data. If you encounter any other errors, let us know in the comments!
Change default save location Windows 10
Conclusion
Everybody knows that iTunes is a complicated program and you never know how it will surprise you:
❌ you can’t find the backup folder
❌ iTunes backup occupies a lot of space
❌ iTunes backup can be corrupted
Changing the location of your iTunes backups offers numerous benefits, including freeing up storage space, preventing disk overload, improving organization, increasing data security, and providing flexibility and portability. By following a few simple steps to relocate your backups with CopyTrans Shelbee, you can optimize your storage usage, streamline your backup management, and enjoy a more efficient iTunes experience.
In this article, we explained to you where iPhone backups are stored on PC. And also we have a simple and fast solution for you – CopyTrans Shelbee. It has advantages:
✔️ Changes iTunes backup location in a few clicks
✔️ Let you choose a folder for a backup
✔️ Validates backups
Just try it and save you time and energy!