


Screen recording on an iPhone is one of those small but powerful features that can make a big difference in your day-to-day tasks. Whether you’re trying to capture a tutorial, save a video from social media, record a bug to show tech support, or simply keep a snippet of a video call, the built-in screen recording tool is incredibly handy.
But what if it suddenly stops working? If you’ve found yourself tapping the screen record button — only to realize nothing’s being saved — or you can’t even find the feature at all, you’re not alone. It can be especially frustrating when you’re in a hurry or need to record something important. Many iPhone users run into this issue and wonder things like “Why is my screen recording not working?” or even “Why won’t my iPhone screen turn on when I try to record?”
Sometimes the screen recording function is restricted due to settings, app permissions, or system glitches. In some cases, the issue might not be with screen recording itself, but with the iPhone’s display — leading users to search “iPhone screen won’t turn on” while troubleshooting. And for those new to the feature, the problem might simply be not knowing how to record screen on iPhone correctly.
In this article, I’ll walk you through the most common reasons why screen recording might not work on your iPhone — and how to fix each one. Whether it’s a quick settings adjustment or a deeper issue, we’ll cover all the possibilities so you can get back to recording your screen smoothly.
How to screen record on iPhone
Before troubleshooting the issue, let us double-check the preliminary settings for smooth screen recording. Follow the instruction on how to screen record on iPhone 12 below.
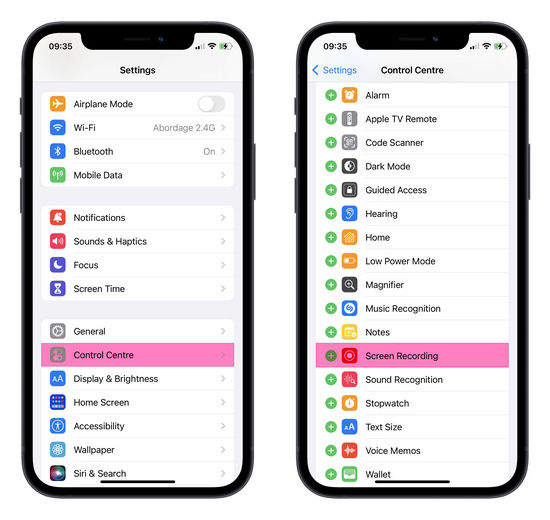
Setting up the iPhone Control Center is an absolute must before recording the screen.
-
On your iPhone, go to Settings > Control Center > Screen recording;
-
Tap on ➕ (the green plus) next to Screen recording;
-
Screen recording has been added to your Control Center in the Included controls section;

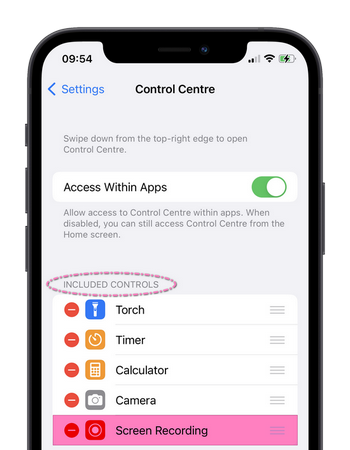
Once you have added the relevant option, you will find a recording icon in the Control Center. To screen record on iPhone 12:
-
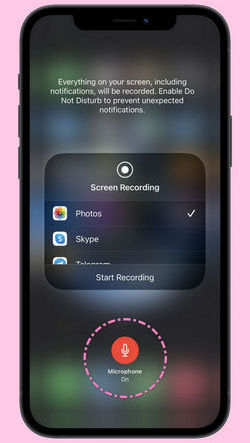
Swipe down from the upper-right corner of the screen and tap on the Screen Record icon;
- Press and long-hold the Screen Record icon;
- Then tap Microphone On as shown on the screenshot;
- Select Start Recording.
-
Once the recording is in progress, you can do whatever you wish to record;
-
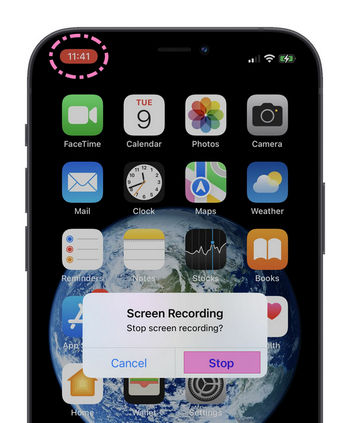
To stop recording, select the red recording icon in the top left corner of your screen;
-
Tap on Stop.
⭐ TIP ⭐
iPhone screen recording no sound
iPhone screen recording no sound? By default, audio is not recorded while you record your screen on iPhone.
If you need to record your voice with the screen recording to comment on a bug, for example, just turn on the microphone.
In the upper right corner of the screen:
💡 You can also do this after starting a recording.
Now you’re recording your screen with sound so you can talk along with it.
![]()
💡 Alternatively, you can use a free third-party app like VEED Screen Recorder. It works with Windows, Mac, Linux, and on smartphones too.
Ok, I made an iPhone screen recording… now what?
Screen record iPhone
Where to Find Your Recording
Once you stop your screen recording, your iPhone quietly saves it to the Photos app. It’s like having a silent assistant who files your video away the second you hit stop.
To find it, open Photos, then head to the Recents or Videos album. Your screen recording will be sitting right there, ready to watch, edit, or share. And you don’t have to stop at just watching it. Tap Edit to trim the start or end, cut out any awkward pauses, or grab a still image from the video if needed. It’s quick, simple, and all built-in.
Once it’s polished, you can:
- Create quick how-tos for friends, coworkers, or clients who keep asking the same tech questions
- Record online class snippets or tutorial steps to rewatch later
- Send bug reports or show errors to tech support visually — way easier than explaining it in text
- Edit it into a reel if you’re a content creator or want to document your process
- Keep records of meetings or presentations when joined from your phone (just be mindful of privacy!)
How long can you screen record on iPhone
Technically, your iPhone doesn’t put a hard limit on how long you can record your screen. The real limit? It all comes down to available storage space and battery life.
If you’ve got plenty of free space and a charged battery, you could record for hours — great for long tutorials, gaming sessions, or presentations. But if your storage is running low, the recording might stop unexpectedly, or not save at all. That’s why it’s always a good idea to:
- Check your available storage before hitting record
- Plug into a charger for longer recordings
- Close other apps to reduce strain on your system
One more tip: long recordings are doable, but trimming and editing them later can turn into a bit of a chore. If you’re recording something detailed or step-by-step, it’s often easier to break it into shorter segments and stitch them together afterward — it’ll save you time and frustration down the line.
Why is my screen recording not working
Now let us take a closer look at the most efficient ways to fix screen recording not working. The troubleshooting steps are listed below:
1. Check Restrictions
In case you see the recording icon greyed out, most likely this feature is restricted. To remove the limitation, do the following:
-
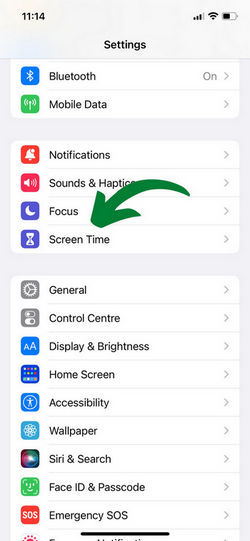
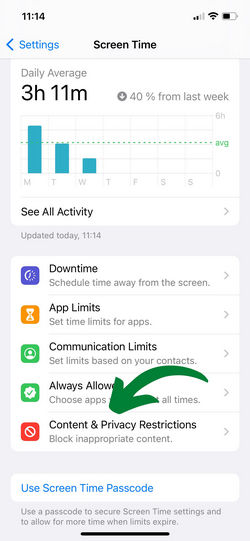
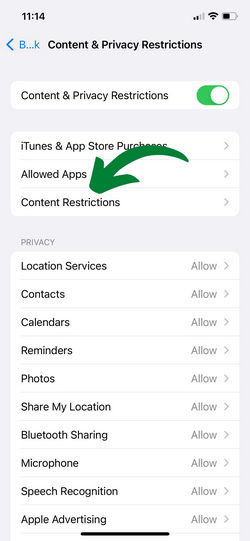
Open Settings > Screen Time > Content&Privacy Restrictions > Content Restrictions.
-
Then scroll down to the Game Center section > Screen Recording to proceed. Tap on Allow.
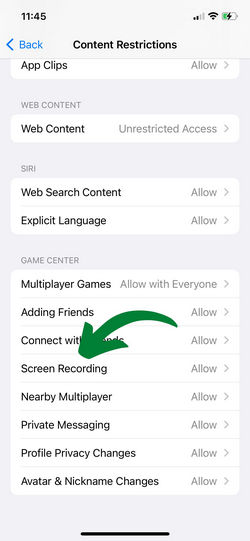
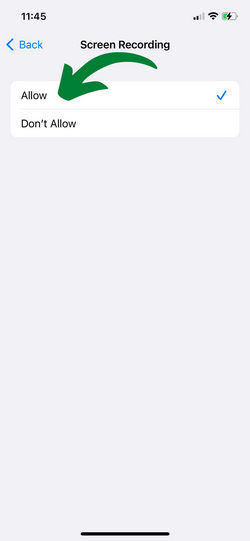
The Screen Recording icon within the Control Center should now be active.
2. Check Storage
A screen recording might not be saved if you don’t have enough storage on your iOS device. To check the amount of storage available, go to Settings > General > iPhone Storage.
💡 If your storage is full, we’ve prepared tips and tricks to free up iPhone space.
3. Turn off Low Power Mode
If you receive the “Screen recording failed to save” error message, the issue is most likely related to the Low Power Mode. When the mode is enabled, some features might not work until you turn it off.
To check it, just go to Settings > Battery and turn off the switch next to Low Power Mode.
4. Upgrade to the latest iOS version
Upgrading to the latest iOS or iPadOS version provides security updates and bug fixes. Therefore, it can help fix the screen recording not working problem.
To check and install the latest updates, go to Settings > General > Software Updates. Download and install the latest update once it is available.
Check out the Apple support article on how to customize automatic iOS updates.
5. Limitation imposed by developers
Screen recording failed to save due to 5823
Error 5823 may mean that the content you are trying to record is copy-protected by the developers. In 2026, many streaming and subscription apps use advanced DRM (digital rights management) systems that automatically block screen capture. This means that some apps impose restrictions on functionality, so you are not allowed to record that specific content.
When attempting to record the screen of copy-protected content (e.g., in apps such as Netflix or Disney+), you may receive an error message stating “Failed to save screen recording due to error 5823,” see a black screen in the recording, or notice that the app freezes or pauses playback. Unfortunately, this restriction is intentional and cannot be circumvented.
However, if you are certain that the content is not protected (e.g., you are recording your home screen or a regular app), the issue may be caused by insufficient storage space, system glitches, or Screen Time restrictions. In this case, refer to the troubleshooting instructions above.
How to send a long video on iPhone
We hope the methods described in the article helped you avoid Screen Recording not working issue. Now you can easily export screen recordings from any iOS device to PC.
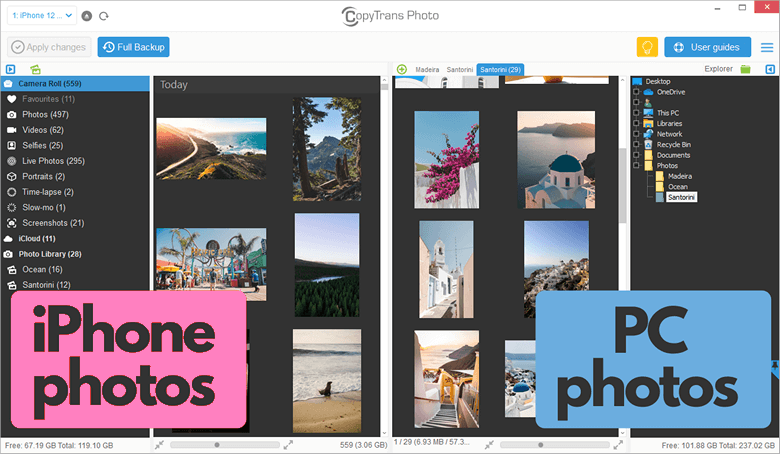
Managing photos and videos on iPhone can be tricky, especially when it comes to saving long videos to your PC without losing quality. CopyTrans Studio makes it effortless. Integrated directly into Windows Explorer, it lets you access your iPhone just like a regular folder. You can copy, move, and organize photos and videos in a few clicks.
And if you need to transfer large videos, CopyTrans Studio saves them straight to your computer in their original quality, so you always keep the memories intact.
Download CopyTrans StudioCopyTrans Studio integrates into Windows Explorer, making transfers quick and simple. But if you prefer a full app view with more management options, then CopyTrans Photo is the way to go.
CopyTrans also developed an app right for this job — CopyTrans Photo. Here is how to send a long video on iPhone to PC using the program:
- Download CopyTrans Photo for free from the following page: Download CopyTrans Photo for free!
- Install the program. If you need help installing CopyTrans Photo, please refer to the installation guide.
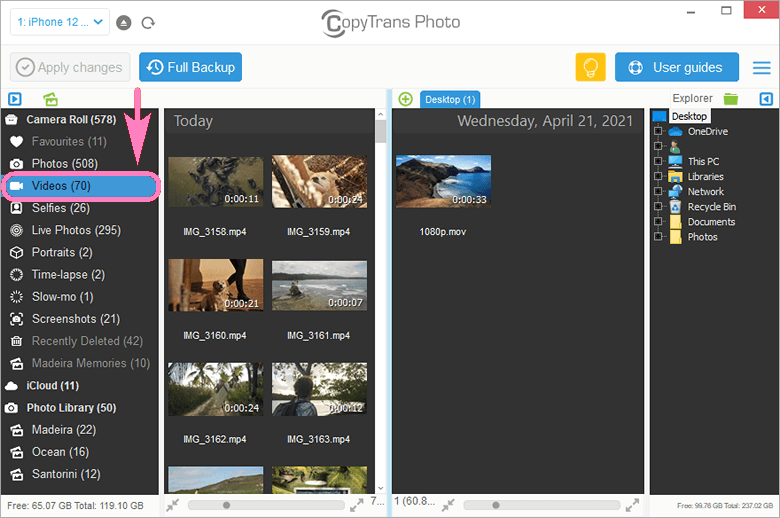
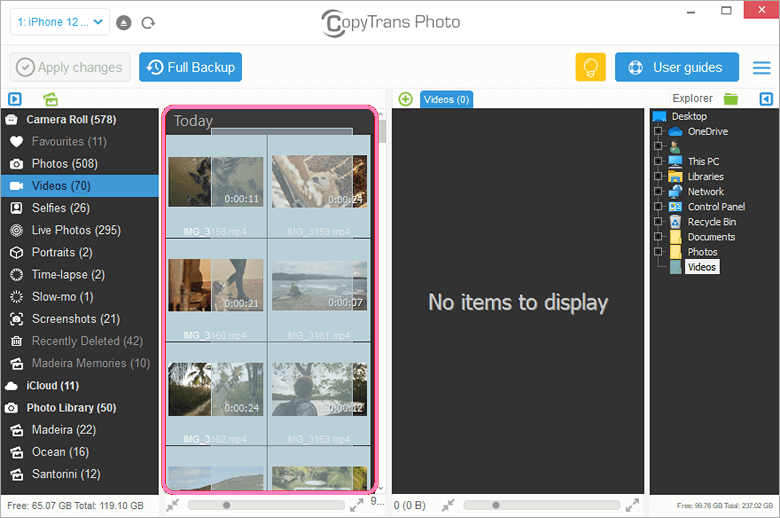
- Start CopyTrans Photo and connect the iPhone to the PC. iPhone videos and albums will appear on the left-hand side of the program window while PC folders will appear on the right.
- Select Videos from the album list on the left.
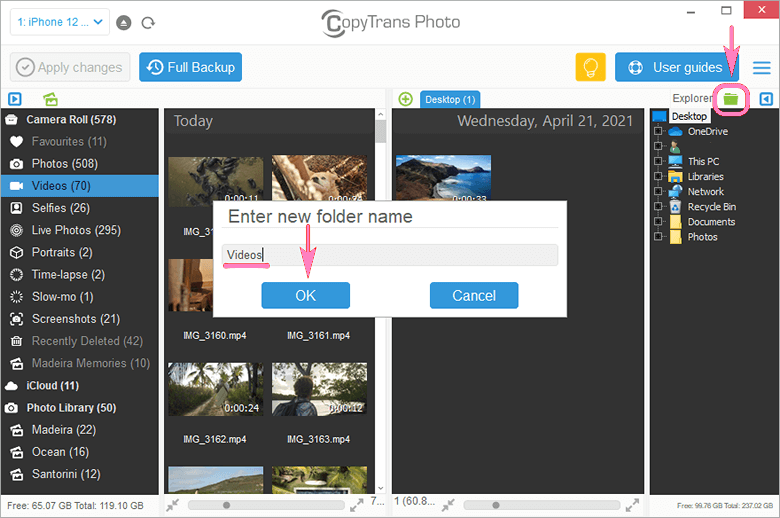
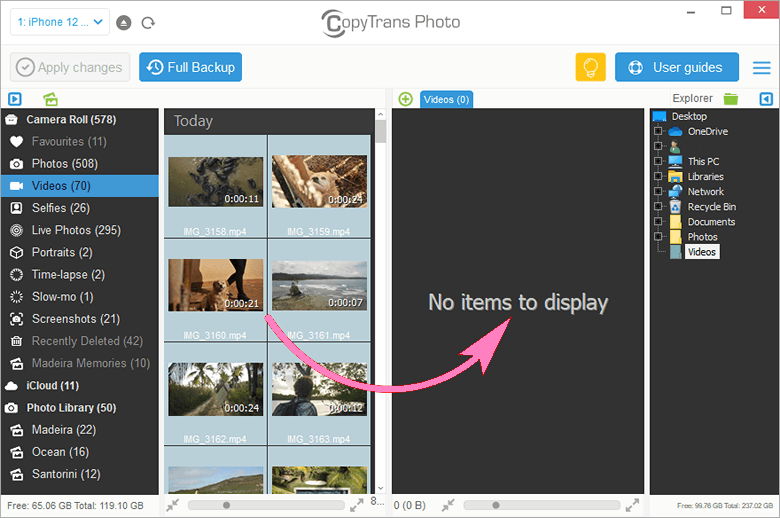
- Select or create a PC folder where you wish to put the videos by using the pane on the right-hand side. To create a new folder, click on the Green Folder symbol on the top.
- Choose the videos you want to transfer from iPhone to the computer. To select multiple files, press and hold CTRL on your keyboard while clicking on each video. To select all the videos in the folder, click on an empty area within the iPhone working area and then press CTRL + A.
- Drag and drop the selected videos to the right-hand side.
- Click on Apply changes to save the result of the transfer.
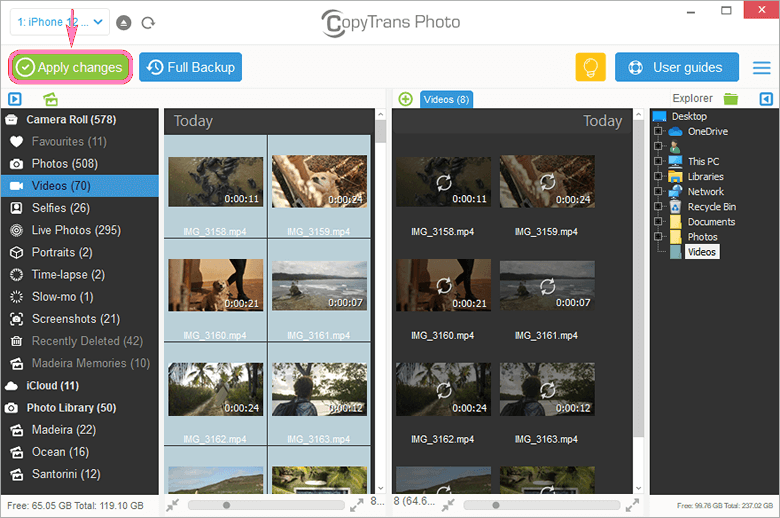
That’s it! Your iPhone screen recordings are now transferred to the PC folder of your choice.
iPhone screen recording
Why can’t I screen record on my iPhone?
If you can’t screen record on your iPhone, it may be due to settings in the control center. Make sure that screen recording is enabled in the settings. Go to Settings > Control Center and add Screen Recording to the included controls. Additionally, check if Screen Time restrictions are in place, as this can prevent you from using the screen recorder.
Why is my screen recording not working on Windows 10?
If screen recording not working on your windows 10 device, the issue may lie with the xbox game bar. Ensure that it is enabled in the settings. You can do this by going to Settings > Gaming > XBox Game Bar and toggling it on. Also, check if your graphics drivers are updated as outdated drivers can lead to recording issues.
What are common reasons why screen recording may not work?
Several common reasons can cause screen recording not working. These include software restrictions, insufficient iphone storage, or having the power mode set to a level that restricts background processes. Additionally, if the application you are trying to record your screen from does not allow screen capture, you may encounter issues.
How do I fix the screen recording on my iPhone?
To fix iPhone screen recording, first, ensure that you have enabled it in the control center. If it is already enabled and still isn’t working, try restarting your iPhone. Go to Settings > General > Restart. If the issue persists, check for any updates in iOS and consider resetting your settings by going to Settings > General > Reset > Reset All Settings.
Why is my screen recording not working
Final Thought
So, why can’t you screen record? Hopefully, by now, that question feels more like a bump in the road than a full-blown mystery. We’ve walked through the usual suspects — from forgotten settings and restrictions to app limitations and full storage. Sometimes, the fix is just a few taps away. Other times, it takes a bit of digging—but either way, you’ve got the tools now.
If you started this article typing “Why isn’t my screen recording working?” into Google in frustration, I hope you’re leaving it with your iPhone back in action — ready to capture whatever’s happening on your screen. Whether it’s a funny moment, a quick tutorial, or something you just don’t want to forget, screen recording can be your digital notepad. And when it works, it’s seamless — like having a tiny cameraman in your pocket, quietly recording what matters most.
And if you’re brand new to the feature and came here looking up how to screen record iPhone, I hope this guide made it easy to get started. At the end of the day, your iPhone is packed with useful tools — and screen recording is one of the most underrated. With the roadblocks out of the way, you’re free to hit record and keep those important moments, helpful how – tos, or fleeting glimpses of your screen saved for later.
If you want to manage an iOS device, CopyTrans offers you many options:
CopyTrans 7 Pack
Special offer
CopyTrans 7 Pack is a bundle of simple apps for a better iPhone + Windows experience. Transfer photos between iPhone and PC, export and import contacts, manage iCloud photos, back up and restore iPhone, and much more…!
✔ Manage 5 devices;
✔ Full iPhone management;
✔ No subscription;
✔ $108 off.
* The offer includes an additional $3 discount and is only valid when purchasing CopyTrans 7 Pack for private use.